
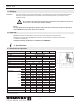
Specifications


6
3001391 06.14
3. Mechanical Installation
3.1 Positioning
In accordance with NFPA 96, roof mounted fans shall have their discharge outlet at least 40 inches
above the roof surface.
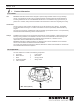
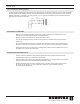
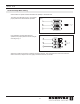
3.2 Installation on Steel Duct
• Insert the adapter (FR) into the grease duct, where the long collar engagement ensures safe
anchoring (See Fig. 2). If necessary, the adapter can be secured by means of long self-tapping
stainless steel screws into the side of the collar through the chimney wall. Do not obstruct
thegreaseow.
• Place the neoprene gasket (sold separately) on top of the adapter.
• Remove the transport securing device (if present) holding the motor shaft and impeller in place.
• Place the fan on the neoprene gasket centered over the cutout.
• Open the fan and secure the fan onto the adapter, through the pre-drilled holes in the bottom, with
lag bolts or self-tapping sheet metal screws, one at each corner.
• Check the gasket to insure that it forms a complete seal.
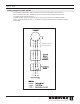
3.3 Installation on Roof Curb
• If the fan is supplied with a curb cap, secure the cap to the roof curb with self-tapping sheet metal
screws (see Fig. 3).
• Place the neoprene gasket on the top of the curb cap with the hole centered over the curb cap
opening (sold separately).
• Remove the transport securing device (if present) holding the motor shaft and impeller in place.
• Place the fan on the neoprene gasket centered over the cutout.
• Open the fan and secure the fan onto the roof curb, through the pre-drilled holes in the bottom, with
lag bolts or self-tapping sheet metal screws, one at each corner.
• Check the gasket to insure that it forms a complete seal.
Fig. 3
Fig. 2
FR
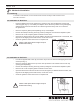
!
Caution: Never place hands or ngers on top of
fan base when closing
!
Caution: Never place hands or ngers on top of
fan base when closing