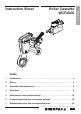
Instruction Sheet WCR4000 Roller Cassette English (GB) Rev.
Roller Cassette WCR4000 Index 1 Introduction . . . . . . . . . . . . . . . . . . . . . . . . . . . . . . . . . . . . . . . . . . . . . . . 4 2 Safety. . . . . . . . . . . . . . . . . . . . . . . . . . . . . . . . . . . . . . . . . . . . . . . . . . . . . 4 3 Assembly and adjustments. . . . . . . . . . . . . . . . . . . . . . . . . . . . . . . . . . . 6 4 Operation . . . . . . . . . . . . . . . . . . . . . . . . . . . . . . . . . . . . . . . . . . . . . . . . . 8 5 Maintenance and troubleshooting .
ENGLISH 1 Introduction Overview The Enerpac WCR4000 roller cassette provides controlled tightening and loosening of fasteners on pipe flanges. It is designed for use in confined spaces where an ordinary hydraulic torque wrench might not fit. The roller cassette is powered by the Enerpac W4000 Series drive unit and a compatible 690 bar (10,000 psi) torque wrench pump. Spanners are available from Enerpac in a wide range of bolt sizes typically used on API flanges.
- - - - - - - - - - - - - - - - - - - nut or bolt a gap may exist between the reaction roller and the pipe flange. When the tool is operated the reaction roller will make forceful contact with the pipe flange. Always make sure the tool is stable. Provide adequate support in vertical and inverted applications. The maximum torque output of the tool must always exceed the torque required to loosen or tighten the nut or bolt.
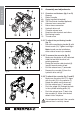
ENGLISH 3 Assembly and adjustments 3.1 1 2 3A 3B 4 5 6 7 8 9 10 Overview and features (fig. A or B) Spanner Roller Cassette Swivel manifold (standard) TSP-Pro Swivel manifold (optional) Advance hose connection Return hose connection Hydraulic drive unit Cassette release lever Reaction roller bracket and rollers Positioning handle Thumb screw Fig. A 3.2.1 To attach the positioning handle (fig. C) • Secure the positioning handle (9) with thumb screw (10). Tighten hand tight.
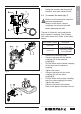
Swing the reaction roller bracket (8) outward, away from center of tool. 3.3 To connect the hoses (fig. F) Make sure all accessories meet the pressure requirements. Make sure the quick connect couplings are securely attached before operating the tool. Fig. D The tool is fitted with male and female quick-connect couplings. Use Enerpac twin safety hoses only. Refer to the table below: Hose model number THQ-706T THQ-712T • • • Fig. E • • • • • Description Two hoses, length 6 m (19.
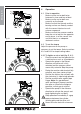
ENGLISH 4 Operation 4.1 - Prior to operation Make sure the nut or bolt to be fastened is clean and free of dust. Make sure the nut or bolt runs correctly on the thread. Make sure that the threads and the bearing surface are liberally coated with the correct lubricant or antiseizure compound. Make sure that the spanner used to keep the nut or bolt on the opposite end in place, is of the correct size and that there is an adequate abutment surface. - - Fig. G 4.
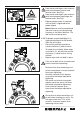
PINCH POINT HAZARD • Fig. J Repeat previous steps as required until nut (bolt) is tightened to the proper torque. Notes: Spanner must be repositioned after each wrench cycle by operating the pump in the Retract direction. The tool contains no spring return. 4.3.2 To loosen a nut or bolt (fig. K, L) • Apply penetrating oil to the threads. Allow the oil to soak. • Reinstall the positioning handle on counter-clockwise (-) side of wrench. • To loosen the nut (bolt), follow steps in section 4.3.
ENGLISH 5 Maintenance and troubleshooting 5.1 • • • • Spanner replacement (Fig M) Remove drive unit from cassette. Loosen and remove set screw (17). Tap spanner pin (18) on one end and remove it from the cassette. Slide spanner (1) out of cassette housing. Apply a thin coat of molybdenum disulphide lubricant to the sides of the new spanner and to the spring pin at top of spanner. Slide new spanner (1) into cassette housing. Align hole in spanner with mating holes in sideplates.
• • • 5.2.2 The hydraulic drive unit • Check tightness of swivel manifold post retaining screws (see 5.3.2) and gland. • Pressurize the drive unit to maximum pressure (Advance and Retract), and check for any signs of leakage. • Any damaged components or seals must be replaced. • Dry all components and apply a thin coat of molybdenum disulphide lubricant as indicated. 5.
ENGLISH • Clean all exposed components with a mild solvent. Inspect all parts for damage. Perform non destructive testing by magnetic particle inspection on the following components: - Cylinder body - Piston rod Apply a small amount of Loctite 243 to the threads of the button head capscrew before reassembly. Apply a small amount of Loctite 243 to the threads in the drive unit, assemble the swivel manifold post and tighten the degreased retaining screws to 5,1 Nm (3.76 Ft.lbs). • • • • 5.
C ENGLISH A B D E Fig. Q 6 Technical specifications and torque settings 6.1 Capacities and dimensions - Model WCR4000 (fig. Q) Spanner size range mm 36 - 80 inch 1 7/16 - 3 1/8 Maximum operating pressure bar 690 psi 10,000 Max. torque at 690 bar Nm 5.762 at 10,000 psi Ft.lbs 4,250 Min. torque Nm 576 Ft.lbs 425 Dimensions A mm (inch) 226 (8.9) B mm (inch) 161 (6.3) C mm (inch) 159 (6.25) D mm (inch) 241 (9.5) E mm (inch) 131 (5.2) Weight (cassette only) kg (lbs) 6,2 (13.
ENGLISH 6.2 Technical Data - Closed End Spanners (fig. R) 6.2.1 Metric system table Spanner Model W4107CS W4108CS W4110CS W4113CS W4114CS W4200CS W4203CS W4206CS W4209CS W4212CS W4215CS W4302CS (F) mm 36 38 41 46 48 50 55 60 65 70 75 80 (G) mm 31,0 32,8 32,8 35,6 38,4 38,4 41,2 45,0 46,8 49,6 52,1 55,4 (H) mm 30,0 30,0 30,0 30,0 30,0 30,0 30,0 30,0 30,0 30,0 30,0 30,0 Weight kg 1,9 2,1 2,2 2,1 2,1 2,2 2,1 2,2 2,1 2,2 2,1 2,2 (H) inch 1.18 1.18 1.18 1.18 1.18 1.18 1.18 1.18 1.18 1.18 1.18 1.
6.3 Torque settings ENGLISH To set the torque, adjust the pump pressure according to the following calculation: Pump pressure = Torque / Torque factor Measurement system Metric Imperial Torque factor 8,351 0.425 6.3.1 Metric system pressure/torque table - Model WCR4000 6.3.
ENGLISH 7 Replacement parts and recommended tools 7.2 Recommended tools for performing maintenance and repairs 7.1 To order replacement parts – – – – – – 1 1 1 1 1 1 – – – – – – 1 1 1 1 1 1 For replacement parts information, refer to the Enerpac repair parts sheet for your wrench model. Repair parts sheets are available on the internet at www.enerpac.com. Have the following information ready when ordering replacement parts: - Wrench model and serial numbers (for both drive unit and cassette).
NOTES: 17
NOTES: 18
NOTES: 19
Enerpac Worldwide Locations Australia and New Zealand Actuant Australia Ltd. Block V Unit 3 Regents Park Estate 391 Park Road Regents Park NSW 2143 (P.O. Box 261) Australia T +61 (0)2 9743 8988 F +61 (0)2 9743 8648 sales-au@enerpac.com Brazil Power Packer do Brasil Ltda. Rua Luiz Lawrie Reid, 548 09930-760 - Diadema (SP) T +55 11 5687 2211 F +55 11 5686 5583 Toll Free: 0800 891 5770 vendasbrasil@enerpac.