
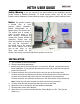
User Guide
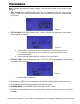

1. SET CLOCK: Press PROG button until “CLK” is displayed on the left corner of the
screen. Press DAY, HOUR, MIN buttons to set the current day and time. (As Illustrated
in Figure 2)
2. SET ON TIME: Press PROG button until “1 ON” & “PROG” are displayed on the screen.
(
A
s
Illustrated in Figure 3)
3. SET OFF TIME: Press PROG button until “1 OFF” & “PROG” are displayed on the screen.
(As Illustrated in Figure 4)
PR
OGRAMMING
Figure 2
a. Press the DAY button to set the day or days you would like this schedule to run.
If you want this schedule to run every weekday, press the DAY button until all
five weekdays appear.
b. Press the HOUR & MIN buttons to set
the time for this schedule
Figure 3
Figure 4
a. Repeat steps 2-a and 2-b.
Note: R button will erase all current settings. Only use this function if you need to reset
the timer.
4. Keep pressing PROG to enter subsequent schedules. Repeat steps 2-a and 2-b to set.
5. Press MAN button to exit and complete programming mode.
6. CHANGE MODE: Press MODE button to activate “AUTO” mode.
7. CLOSE cover and push down on one of the outer corners to run the next “on” or “off” auto
schedule.
If you have any questions, you can call us at 844-390-2568, from 8:00AM-4:30PM (PST), Monday-Friday.