
User Guide

Safety Warning
: If you are unsure of any steps outlined in the installation process,
please consult a certified electrician. To avoid electric shock, turn off the circuit
breaker before installation. Please follow the step by step guide to safely install the timer .
1. Turn off power at the circuit breaker.
2. Remove the existing wall switch.
3. Identify each wire in your junction box. You need Hot, Neutral, Load and Ground to
finish installation. If your junction box only has 3 wires (Hot, Load and Ground), the
product will not work.
4. Connect the black wire (Hot) on the timer to the Hot wire in the junction box.
Connect the white wire (Neutral) on the timer to the Neutral wire in the junction box.
Connect the red wire (Load) on the timer to the Load wire in the junction box.
Connect the green wire (Ground) on the timer to the Ground wire in the junction box.
Note: Fasten the wire nuts to make sure wires are securely connected.
5. Tuck the wires into the junction box and leave room for the timer.
6. Mount the timer to the junction box and install the wall plate.
7. Restore power at the circuit breaker.
8. Open the cover on the timer and switch the ‘Power Button’ to ‘ON’. Then you are
ready to go.
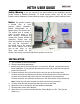
HET01 USER GUIDE
Notice
: The product requires
a neutral wire to work
properly. Before installation,
please double-check for a
neutral wire in the junction box.
The neutral wire is usually a
group of white wires. If you
have difficulty identifying the
neutral wire, please consult an
electrician. Please note the
white wire (neutral) on the timer
can only be connected to
the neutral wire in the junction
box. Never connect the white
wire on the timer to any
other wire except for the
neutral. Mis-wiring
may cause light flicker, sparks,
or even fire.
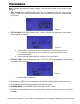
INSTALLATION
Figure 1