
Use and Care Manual


P a g e | 2
IF THERE IS ANY DAMAGE OR MISSING PARTS, PLEASE CONTACT ENERG+ CUSTOMER SERVICE AT 866-967-
7333 ext. 227 (8:30 AM to 5:00PM Eastern time) or email us at: info@ebiweb.ca
2. ASSEMBLY
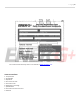
Parts
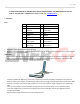
# Part Name # Part Name
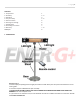
1 Control Box 8 Middle Tube
2 Tilt Screw 9 Lower Tube
3 Screw M4*8 10 Base
4 Heater 11 Washer
5 Straight Tube 12 L Shaped Screw
6 Fixation knob 13 Screw M6*15
7 Upper Tube 14 Power Cord
1. Prepare a cross head screw driver (not included).
2. Read this instruction manual carefully before installation and use. Keep this instruction manual in a proper and safe
place for future use in case needed.
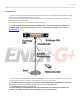
Installation:
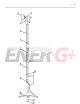
Put the lower tube (#9) through the hole of the base (#10) making sure the end of the lower tube with the welded
plate is downward, and that the extra tongue is located in the hole of the base. Fix the lower tube and the base
together with the washer (#11) inserted into the L shaped Screw (#12).
Install the middle tube (#8) on top of the lower tube and fix it with the provided screws (#3). Fix the upper tube
with the middle tube using the provided screws (#3). Pull out the straight tube (#5) upward from inside of the upper
tube (#7). Screw the outer fastener (#6) clockwise to lock it. Then install the upper tube (#7) on the middle tube
(#8).
Turn the outer fastener counter-clockwise and adjust the unit to a desired height. Turn it clockwise to fix it.
Insert the straight Tube into the hole at the bottom of the control box (#1). Then fix them together with the
provided screw (#14).
Clip the power supply cord with the cord clips along the tubes.