
Installation Guide

INSTALLATION GUIDE
Mounting
• Choose the location of The Wanderer with focus on keeping the battery as close as possible
(less than 1.5m is ideal) to the system. If the distance from the battery to The Wanderer is
greater than 1.5m, larger diameter cable than the supplied 50mm2 will be required.
• Consideration must be given to avoid moisture and excessive dust.
• Firmly fasten The Wanderer by fastening through the black plastic backing panel of The
Adventurer to your vehicle using suitable fasteners (not supplied). Ensure the structure you
are securing The Wanderer to is rigid and can support the weight of the power system.
Caution: Ensure any debris from the mounting process is thoroughly removed to prevent damage to
equipment or wiring.
Caution: Ensure that there is adequate spacing for wiring and be sure to check no wiring is in the path of
fasteners when mounting the power system.
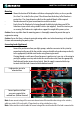
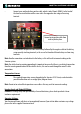
Connecting Loads (Appliances)
• Connect the positive wire from your lights, pumps, and other accessories to the system by
connecting to either one of the four switches using insulated female spade crimps or directly
to the appropriately labelled circuit breaker using 4mm ring terminals.
If wiring through a switch you will need to connect a positive wire (same size as the wiring to
your lights, pump or accessory and rated to the circuit breaker value) from the appropriately
labelled circuit breaker to your desired switch. Note the supply is connected to the top
terminal whilst the load is connected to the bottom terminal.
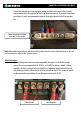
Fridge positive wire to be
connected here
Connect positive wire from
accessories required to be
switched here. (Bottom Terminal)
Note
: Ensure current ratings of the accessories do not exceed the circuit breaker ratings or the switches,
which are rated at 20A each switch. If larger loads are to be switched use a relay.
Note: Cables must be sized to handle the current rating of the circuit breaker that the load is connected to.