
Installation Manual


INSTALLATION GUIDE
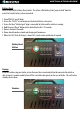
Mounting
• Consideration must be given to avoid moisture and excessive dust.
• If you choose to x Archie into a semi permanent location use the supplied mounting brackets.
• Slide each bracket into the slots located on the front and back of Archie.
• Use appropriate fasteners for the material the brackets will be fastened into. It is
recommended where possible use a bolt and nut (nutsert or similar) especially if you are
planning on frequent removal.
• The two handles on Archie can be removed to reduce overall height when used in installed
applications.
• Alternatively you can use 2 x tie down straps over the Archie, run from side to side.
Caution: Ensure any debris from the mounting process is thoroughly removed to prevent damage to
equipment or wiring.
Caution: Ensure that there is adequate spacing for wiring and be sure to check no wiring is in the path of
fasteners when mounting the power system.
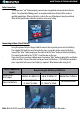
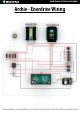
Connecting Loads (Appliances)
Archie is designed as a portable/fast install system therefore has the following outlets allowing you to
connect various DC and AC equipment.
• 2x 50 Amp Anderson (1 Front, 1 Rear), protected by the “ANDOS” circuit breaker.
• 2x Twin USB 2.4A Hi Amp Sockets, protected by the “USB Outlets” circuit breaker and controlled
by the “Outlets” circuit breaker.
• 3x 12V DC Power Outlets, 2 on the front, 1 on the rear, protected by the “DC Outlets” circuit
breaker and controlled by the “Outlets” circuit breaker.
• 1x 230V AC outlet supplied from the 600W true sine wave inverter, protected and controlled by
the “Inverter” circuit breaker. Inverter also has internal over load protection.
Always ensure you use the appropriately rated socket for based on the current draw of your appliance being
connected.
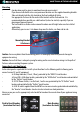
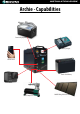
Mounting Bracket
& Fasteners
Push to Reset Breakers
(located on the front)
Main Breakers
(located on the back)