
Product Manual
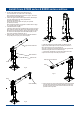

Assemble Crane E500series
- 02 -
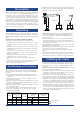
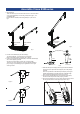
1. Mounting Base
There are three ways to mount the base. One is to mount the base
on the ground(pedestal) or under the ground(socket) fig.2 , and
on Roll Base fig.3.
After the base is installed, insert Fixing Bush(#1-1) as sown in
fig.4.
roller roller
pedestal base socket base
Fixing Bush
Base installed
flush
Base installed
upright
Base installed
on roll base
Fig.2
Fig.3
Fig.4
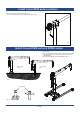
2. Put the mast weldment(#2) into the base(#1).
The mast weldment can rotate 360° in the base(#1).
Refer to Assembly Drawing and Part List on page x.
3. Fasten the upper bracket weldment(#3) to the mast weldment(#2)
with 2 clevis pins(#5) provided.
Secure the clevis pins(#5) in place with 2 cotter pins(#6).
There are two mount positions for the upper bracket weldment
(#3), A-A(fig.5-A) and B-B(fig.5-B) to regulate the crane angle.
View fig.5 below.
A
A
B
B
Fig.5-A
Fig.5-B
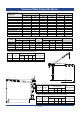
4. Slide the telescopic boom(#4) into the upper bracket weldment
(#3) and secure in place with clevis pin(#5) and cotter pin(#6)
provided.
There are 3 positions for the telescopic boom(#4) in the upper
bracket weldment(#3) to regulate the boom extended length.
Refer to Assembly Drawing and Parts List on page 9.
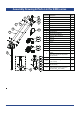
5. Fit the pulley assembly(#9) to the boom with the axis pin(#7)
and secure the axis pin with cotter pin(#11) provided.
6. Fit the stop pin(#8) at the very front side of the boom and secure
the stop pin with the hair cotter pin(#10) provided. Fig.5
Pulley Assembly
Cotter Pin
Clevis Pin
Hair Cotter Pin
Stop Pin
Fig.6