
Installation Guide
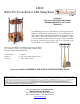

Assembly and Installation Instructions
to modify your LR2 rack to become an LR2tr
Enclosed you will find everything needed for the assembly
of your tool retrofit kit. The parts and hardware included are:
1 Tool holder 1 Shovel
1 Poker 2 – 3/8” x 3/4” Button head screws Tool Holder
1 Broom 1 – 7/32” Allen wrench
Button head screws
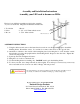
ASSEMBLY INSTRUCTIONS
1) Using the Allen wrench, remove the button head screw from one side of each upright to detach the
kindling holder. Discard the screws. Loosen but do not remove the screws on the opposite side.
2) Attach the tool holder to the outside of the rectangular piece by inserting the ¾” screw from the outside,
through the tool holder, the upright and into the kindling holder. Repeat on the other side. Tighten the
screws only finger tight.
3) Square up the rack and tighten all screws.
4) Hang the tools on the tool holder hooks.
5) Use the kindling holder for kindling only. DO NOT stack logs in the kindling holder.
6) To clean your rack, use a damp cloth and dry it thoroughly. If a touch-up is ever necessary, remove any
dirt or rust with steel wool and re-coat with a “Pledge” like wax product.
It is important that your rack is assembled correctly. If the unit is assembled or used
incorrectly, it could become unstable and collapse, possibly causing injury.
If you need help, please call 1-877-ENCLUME
Enclume Design Products
24 Colwell Street, Port Hadlock, WA. 98339
Phone 360-385-6100 Fax 360-385-6156
www.enclume.com
WARNING