
Installation Guide
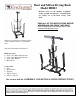

Rack Assembly: (Please note: Do not tighten the screws completely until rack is fully assembled)
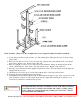
1) Locate the legs and insert each end into one of the 4 hard glides. Then place the legs on the floor hard
glides down.
2) Place a boot holder cross wise on one end of the legs, align the holes and with the 5/16" x 1/2" button
head screws, attach to legs. Repeat on the other side.
3) Place one upright cross wise on one of the center holes with the L facing out and the tall side in the
center. Attach with one of the 5/16" x 1/2" button head screws. Repeat on the other side.
4) Place Top Cross bar between the 2 uprights and place the 5/16" x 1/2" button head screw through both
uprights and the cross bar.
5) Attach the 4 accessory hooks (2 on each side) with the 5/16" x 3/8" button head screws.
6) Square up the rack and tighten the screws securely.
7) Our hammered steel racks are finished with an industrial wax designed to give years of protection to the
rack. Cleaning is easily done with a damp cloth. Dry thoroughly after cleaning. If a touch-up is ever
needed we recommend a commercial wax product.
WARNING
It is important that your rack is assembled correctly. If the unit is assembled
or used incorrectly, it could become unstable and collapse, possibly causing
injury. Please use caution when drying clothing near a fire source. Fabrics
are combustible and could ignite.
Enclume Designs LLC • 24 Colwell Street • Port Hadlock, WA 98339 • 360.385.6100 • www.enclume.com