
Assembly Instructions

1
2. Each tree section is numbered with a sticker. Identify all sections before assembling.
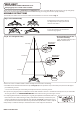
3. Assemble the tree from the bottom to the top (see Fig. B). Open the protective cap on the lower pole, then insert the upper
pole until firmly secured.
* It’s easier to check the pole connectivity and shape the branches, section by section.
4. For pre-lit trees, plug the power cord/adapter into the wall outlet. Tree Section 1 should be lit instantly. If it’s not, or some bulbs
do not light or flicker, see TROUBLESHOOTING TIPS to fix it before moving on to the upper section.
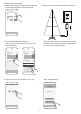
5. For shaping, allow branches to fall into place or gently pull upwards and outwards; make sure
that all wires are free of branch hinges. Always start with the lowest tips closest to the pole;
pull the individual tips alternately upwards and outwards (see Fig. C) and work your way to
the tip of the branch. Continue to work row by row until the top row of the section is shaped.
6. Repeat Step 3-5 until the Tree Top is installed. Your tree is now ready to be decorated.
Light
Controller
MODEL #: TG76P4A73D02
*Electrical Rating For The Tree
(For Indoor Use Only)
Input: 100-240V, 50/60 Hz, 0.35 A
Output: 29 V DC 0.45 A
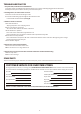
Fig. B - Tree and Light Assembly
1. Find a flat, level surface near an electrical outlet and assemble the tree stand as shown in Fig. A.
Thank you for purchasing your Smart Tree from Polygroup®! This tree comes with Quick Set® technology - Set up and light up
your tree in less than 10 minutes! The instructions below will help you set up your new tree quickly and easily.
ASSEMBLY INSTRUCTIONS
Tree Top
Section 2
Section 1
NEED HELP?
DO NOT RETURN TO STORE. PLEASE VISIT US AT:
www.polygroupstore.com OR 1-888-919-0070
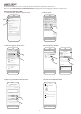
Do Not Tamper
Internal Parts
Open the
protective
cap
Do Not Tamper
Internal Parts
Open the
protective
cap
Adapter
to be plugged
into wall
outlet
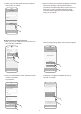
Fig. A - Tree Stand Assembly
Click
Pull apart the legs of the stand so that they
are snapped into an x-shape, place the tree
stand on a level surface.
To close the stand, press the metal button
and fold the legs together.