
Assembly Instructions

SAVE THESE INSTRUCTIONS
769839-132 Page 5 of 6
TROUBLESHOOTING INSTRUCTIONS
With proper care, the LEDs should work for many years, however, as in all products some LEDs may go out early. This
tree is supplied with spare LED bulbs just in case replacement is need, which is done quickly and easily following the
trouble shooting directions below.
Notes:
Unlike standard sets, it is normal to see some bulbs not working, and still have the other lights in the set still
illuminating; this is one of the ways an LED bulb can go out.
When replacing bulbs please make sure to line up the bulb locking tab on the bulb with the lampholder, as the
LEDs are polarity (directionally) sensitive, and inserting the bulb backwards may cause a good bulb to go out
and no longer work.
When replacing bulbs, always use the same color replacement as the bulb you are replacing.
Promptly replace non-functional, missing or broken bulbs following the bulb replacement instructions in the
safety instructions.
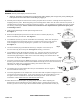
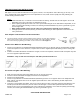
If the Adaptor is Not Connected to the Control Box
1.
Locate the male connector at the bottom of tree Section (C) and align matching
tabs on the insides of the connector and the female end of the adaptor. Secure
the connection by tightening the collar on the connectors.
See Figure 6.
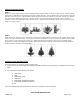
If Some of the Bulbs Are Not Working:
1. Check for any bulbs that are installed backwards (bulb locking tabs are on opposite sides of the lampholder and bulb),
remove and replace in correct direction, or replace with one of the supplied spare bulbs making sure the locking tabs
line up.
2. If bulb is not installed backwards and still does not light, it needs to be replaced, remove the bulb and replace only with
one of the supplied replacement bulbs.
WARNING – Only use with the included spare LED bulbs provided with this tree.
NOTE- Bulb shape may not match product.
If a Section of Lights is Not Working:
1. Make sure that all the light string plugs within the tree are securely connected.
2. Check that all the LEDs bulbs are tightly inserted into their lampholders.
3. Check for any missing bulbs.
4. Check for any bulbs that are installed backwards (bulb locking features are on opposite sides of the lampholder and
bulb), remove and replace with one of the supplied spare bulbs of the same color following the bulb replacement
instructions above.
5. Using one of the supplied spare bulbs, start at one end and work your way to the other replacing each bulb that is out
with the spare bulb and continue the process until that section lights. See the bulb replacement directions above.
Please be sure to line up the bulb locking tab on the bulb with the lampholder, as the LEDs are polarity (directionally)
sensitive, and inserting the bulb backwards may cause a good bulb to go out.
Fig. 6