
Assembly Instructions

SAVE THESE INSTRUCTIONS
769839-132 Page 4 of 6
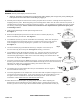
SHAPING INSTRUCTIONS
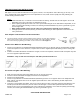
STEP 1
Begin to shape the branches by always working from the bottom section of the tree to the top (1a). When working
each section, start with the tips closest to the tree’s center pole (1b). Fan out branch tips, one to the left, one to the
right and one at the center. Tips should be alternately placed so they do not line up one after another (1c). Branch
tips should curve
slightly
upwards (1d). This will create a more natural looking tree profile. Once a section is
complete, locate next section and repeat same process. Adjust branches between separate tree sections to avoid
leaving any open spaces.
(1a) (1b) (1c) (1d)
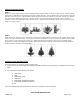
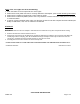
STEP 2
When working on the top section, the branch construction is slightly different. Holding the top section, begin to pull
down each layer of branches (2a). Evenly space each row of branches as you work your way towards the top (2b).
Once at the top, locate the top tip of the tree. It will be the longest tip length you will see (2c). Pull this branch
straight up to create your complete tree profile. Place finished section onto the center pole and arrange branches
between sections to create a seamless look.
(2a) (2b) (2c)
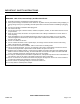
CONTROL BOX INSTRUCTIONS
Use the control box to select the desired lighting effect.
1. If lights do not turn on when light cord is plugged into wall receptacle, press the button on control box once to turn on
lights.
2. The control box has the following color effects:
a. Warm White
b. Multi
c. Warm White Fade
d. Multi Fade
e. Warm White & Multi Slow Flashing
f. Warm White & Multi Fast Flashing
g. Off
To use the different light functions press the button once to advance to the next function.