
Assembly Instructions

SAVE THESE INSTRUCTIONS
769839-132 Page 3 of 6
ASSEMBLY INSTRUCTIONS
WARNING: Risk of personal injury and electric shock
a. Watch for and replace any bulbs that may have broken during shipping and storage each year by following the
bulb replacement instructions before assembling or plugging in.
1. Carefully remove all pieces from the box and lay out parts flat on the floor. Carefully remove all protective
wrapping from the parts. Before beginning tree assembly please make sure all carton contents are present. A
complete listing and diagram of contents are listed on page 1. Do not attempt to assemble the tree if any parts
are missing or damaged.
Please contact our customer service department for replacement parts prior
to returning to store.
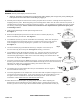
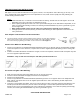
2. Take the Tree Stand (D) out and open the legs form an X”.
See Figure 1.
3. Remove the plastic pole protectors from the end of tree sections (B) and (C)
before assembling and discard.
See Figure 2.
4. Insert Bottom Section (C) into the assembled Tree Stand (D). Make sure the pole is
firmly inserted into the stand and turn the 3 eye bolt screws so they touch the tree
trunk. Straighten the tree by adjusting the eye bolts in or out and then tighten.
See Figure 3.
5. Locate the female plug from Bottom Section (C) and place it near the top of
the tree section by the center pole.
See Figure 4
showing connectors.
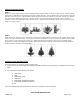
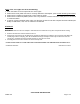
6. Insert Middle Section (B) into Bottom Section (C). Connect the male connector from
Middle Section (B) into the female connector from Bottom Section (C). Secure the
connection by tightening the collar on the connectors making sure that the tabs in the
connectors are aligned.
See Figure 5.
7. Insert the Top Section (A) into Middle Section (B). Connect the male connector from Top
Section (A) into the female connector from Middle Section (B). Secure the connection by
tightening the collar on the connectors making sure that the tabs in the
connectors are aligned.
See Figure 5.
8. The adaptor and the Control Box will come pre-assembled on the tree lights at
the end of Bottom Section (C).
9. Insert the plug blades on the adaptor into an 110V-125V wall receptacle for lights to turn on.
The entire tree should now be lit. If not, press the button on the Control Box to turn on
the lights. Use the Control Box to select the desired light effect. Refer to further
instructions under CONTROL BOX INSTRUCTIONS below.
10. Allow branches to fall into place or gently pull up and out. When adjusting the
branches be sure that all wires are free of branch hinges. Please note that the Top
Section (A) does not have hinges like the Middle Section (B) and Bottom Section (C).
Fig. 1
1
Fig. 2
Fig. 3
Fig. 4
Fig. 5