Recall Notice It is Enabling Technologies goal to uphold the highest quality of products, service, and safety in the industry. We regret to inform you of this recall notice for all Dynamiques sold before January 1, 2018. All Dynamiques with initial versions of the Dynamique’s Seat Pivot must install a Seat Pivot Repair Kit before they can safely use their ski on the slopes again. This notice is outside of our Adaptive Skiing Equipment Warranty Policy.
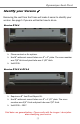
Dynamique Seat Pivot Identify your Version ✔ Removing the seat from the frame will make it easier to identify your version. See page 5 if you are unfamiliar how to do so. Version DY4.4 ➢ Please contact us for options. ➢ Had 6” wide seat mount holes on a 9” x 2” plate. The cross member was 7/8” thick and pivot tube was 1 1/8” thick. ➢ Sold 2015. Version DY4.5 & DY4.6 ➢ Require an 8” Seat Pivot Repair Kit. ➢ Had 8” wide seat mount holes on a 9” x 1 1/2” plate.
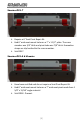
Version DY4.7 ➢ Require a 6” Seat Pivot Repair Kit. ➢ Had 6” wide seat mount holes on a 7” x 1 1/2” plate. The cross member was 3/4” thick and pivot tube was 7/8” thick. Evacuation straps are slip knotted to the cross member. ➢ Sold 2017. Version DY4.8 & Greater ➢ Have been rectified and do not require a Seat Pivot Repair Kit. ➢ Had 6” wide seat mount holes on a 7” wide seat pivot made from 1 5/8” x 11/16” angle material. ➢ Sold 2018 - Present.
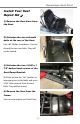
Dynamique Seat Pivot Install Your Seat Repair Kit ✔ 1) Remove the Seat Liner from the Seat. 2) Unfasten the two sidewalk bolts at the rear of the Seat. Use a #2 Phillips screwdriver. You can discard the two rear bolts. They will not be reused. 3) Unfasten the two 1/4-20 x 1 7/8" button head screws at the Seat Dump Bracket. Shift the ski into the “Up” position to improve access to the bolts and use a 5/32” Allen wrench. Save the two bolts. They will be reused. 4) Remove the Seat from the Frame.
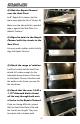
5) Slide the Repair Channel over the Seat Pivot. An 8” Repair Kit is shown, but the same steps apply for the 6” Repair Kit. Make sure the side with the rounded edge is against the Skid Plate. It is labeled “bottom.” 6) Align the holes in the Repair Channel with the rivnuts in the Seat Pivot. You may need a rubber mallet to fully align the Repair Channel. 5) Check the range of rotation. It will be limited, but the Seat Pivot should still rotate enough for the adjustable dump feature.
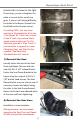
Dynamique Seat Pivot A bent plate is shown to the right. If necessary, you can straighten the plate or rivnuts with a set of vice grips. If you are still having difficulty, the holes in the Repair Channel can be drilled out to the next size up. If installing 2022+ you may have received a Standardization Kit in lieu of the Repair Kit. It has holes at both 8” and 6” wide. If you would like to simply continue with your Co-Poly Seat then proceed to Step 7 here.
[8]