
User's Manual
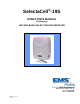


SelectaCell
TM
Operator’s Manual – Preliminary EMS Wireless
EMS Wireless SelectaCell®-19S Manual
Confidential and Proprietary Information
IM609873-1 Rev 01
07/11/05
9
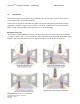
Frequency setting changes are password protected and by pressing Ctrl-Alt-p enter password
as all caps " PASSWORD"
a. Select the “By Band” method of Frequency Selection
i. Select the appropriate PCS band or sub-band with a mouse click. (Single alpha
letter of entire band or alpha numeric segments).
ii. Bandwidth selection of 5 MHz or 15 MHz will display automatically if band is
selected by band but is also used to select frequency band width filter size
entering Center Frequency.
b. After selecting the correct frequency band, save by selecting the “Set” button with a
mouse click to activate and store this information in the SelectaCell®.
c. Next move to the next screen by selecting the top Control tab
i. Press to Restart and view the power and gain. (Screen C) and save all
programmed information
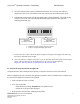
d. “By Center Frequency” method of Frequency Selection
i. Click on and select the appropriate box for By Center Frequency
ii. Select the requested Bandwidth filter size of either 5 MHz or 15 MHz
iii. Input the 4 digit PCS downlink frequency and Uplink the uplink frequency will
appear .
e. Verify input downlink and uplink frequency
f. After selecting the correct frequencies, save by selecting the “Set” button with a mouse
click
g. Next, to activate and store this information in the SelectaCell® move to the next screen
by selecting the top Control tab
i. Press Restart and view the power and gain. (Screen C) and this will save all
programmed information, which will take 15 – 20 seconds to reset
Note: if “Restart” is not activated, the unit will not retain the requested band and will
startup in the previously selected or factory fault band upon a power recycle. .
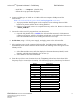
9. Viewing System Downlink and Uplink RF Power and Gain (Screen C)
a. Select the screen Control tab
b. Activate “Restart” button with a mouse click to view the newly selected frequency
band setup, which will take 30 – 60 seconds to adjust.
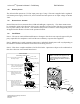
c. When the unit LCD displays OK, disconnect the USB cable
Place the unit in a window with the LCD facing desired coverage area, wait a few minutes for
automatic adjustment and now you are up and running.