
Installation Guide

Step One: Base Trim
Mark position of studs if applying to drywall.
Cut base to measured length and apply adhesive to the back.
Place base onto wall bottom with groove facing up for wainscoting. Level
base to ensure it is horizontal. Nail base into studs. If floor is not level,
add a piece of quarter round or shoe moulding to cover any gaps between
the base trim and the floor.
If joining two pieces of trim end to end, each should be miter cut at a 45°
angle to create a seamless appearance.
Step Two: Tongue and Groove Planking (sold separately)
Review instructions for installing the tongue and groove plank paneling
on its package.
Step Three: Chair Rail Trim
Cut the chair rail to measured length and apply adhesive to the back.
Place the chair rail over the planks so the groove fits on top of them.
Leave a 1/8 inch gap between the top of the planks and the chair rail trim
to allow for expansion and contraction. Make sure the chair rail is level
before nailing into studs.
If joining two pieces of trim end to end, each should be miter cut at a 45°
angle to create a seamless appearance. Apply bead of caulk along the
top, inner edge of the trim to fill in any exposed gaps.
Preparation: For interior use only.
Because this is a real wood product, you MUST condition the wood to the environment to which it
will be applied. To minimize excessive shrinkage, open the package and spread the boards out in
the room where it will be installed. This process should be at least 72 hours and longer if possible.
Please note: This product is not recommended for use in high humidity areas (i.e., bathrooms, etc.).
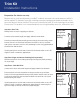
Attach base
with groove
facing up for
planking
Floor
Base
Wall
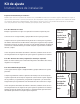
Attach chair
rail with
groove for
planking
facing down.
Paneling
Wall
1/8″
Trim Kit
Installation Instructions