
Specifications


pdfcrowd.comopen in browser PRO version
Are you a developer? Try out the HTML to PDF API
I would like to see the option for higher resolution than 1/3 octave, which would simply require a software update.
Otherwise, the RTA offers an easy way to measure the frequency response of your system using the built-in tone
generator, and the Listen function is a great way to see happens when playing other material through your system.
Full Range
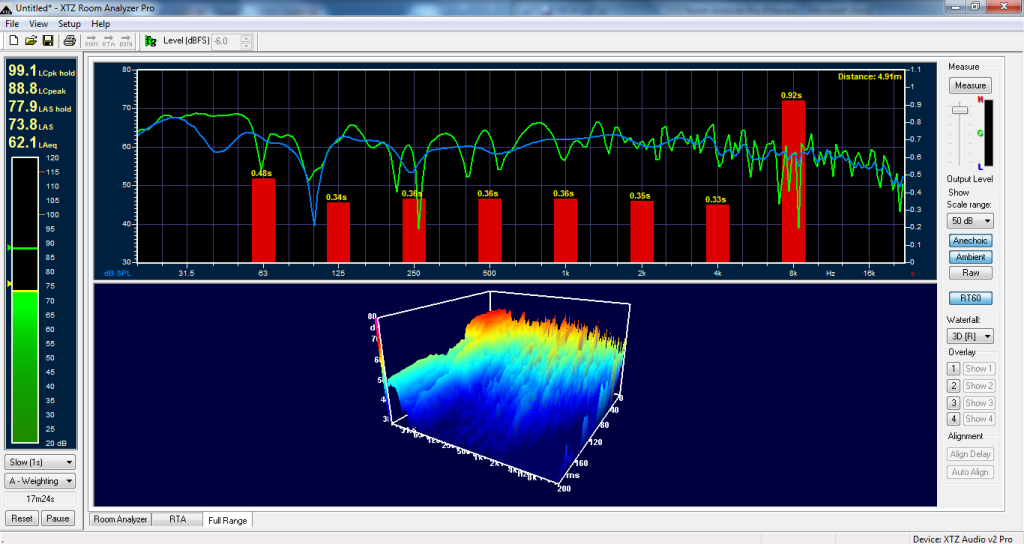
The last major component of Room Analyzer II Pro is the Full Range window. This window gives you the type of
controls that you would expect from an acoustic measurement package, such as 20Hz-20kHz sweeps, RT60, and a
waterfall plot. The controls are very similar to the RTA and Room Analyzer windows, including an adjustable scale
(30, 40, 50, 60, 80dB) and four overlays. The scale cannot be adjusted along the x-axis (frequency), nor can
smoothing be adjusted. For most people, the available scale adjustments will work great, I’m just used to more
customizability.
Full Range Results w ith 3D Waterfall Plot and RT60
The screen is split into two panes, a frequency response plot on top and waterfall plot on bottom. The divider
between the two can be moved up or down to adjust the size of each plot. In the frequency response window, you
can toggle on or off the display of RT60 (1 octave resolution) and switch among three different types of curves:
anechoic, ambient, and raw. The anechoic curve (blue in the above image) is supposed to remove room interference
by gating the response to 4ms. The ambient curve (green in the above image) is supposed to show room interaction
by gating the response to 8ms, and Raw is full FFT. I think the RT60 and different curve options are handy, but
would prefer a manually adjustable time gating instead of only three options. Then again, the three options probably
make things easier for new users.
One feature unique to Room Analyzer II Pro is an Auto Align option that compares the acoustic distance between
your speakers and subwoofer. You start by taking a measurement with a single speaker, then saving it using the
first overlay, and then taking a second measurement using only the subwoofer. Next, you click the “Align Delay”
then “Auto Align” buttons. The program tells you the acoustic distance difference between the two measurements
(displayed in milliseconds and meters), which you use to set speaker distance in your receiver. Upon first testing
out this feature, I was unable to get consistent results. I later determined that excess background noise and