
Specifications


pdfcrowd.comopen in browser PRO version
Are you a developer? Try out the HTML to PDF API
XTZ Room Analyzer Softw are Screenshot
Measurements for each section of the software are loaded and saved independently, though RTA measurements
cannot be exported or loaded. Saving each section independently makes sense, but I would also like a “save all”
option. You can also export a screen dump, which is a screen capture of whatever section of the software you are
using at the moment.
In addition to the four sections of the software, a noise generator is included that can output white or pink noise in
1/3 octave intervals from 16Hz to 20kHz. This is a great feature to help identify any buzz or rattle issues in a room.
SPL Meter
The most basic requirement of any acoustic measurement suite is an SPL meter, and the Room Analyzer II Pro’s
SPL Meter has enough configuration options for most anyone. You can select between slow (1 second) or fast (125
milliseconds), and A, C, or Z weighting. A weighting is designed to reflect the natural response of the human ear.
It’s not particularly applicable for home theater, but is often used when setting levels in large venues, like a concert.
C weighting mimics the human ear at listening levels of 100dB or more. C weighting and slow speed is typically
used when setting speaker levels in a home theater. Z weighting is linear from 10Hz to 20kHz, applying no
weighting. The mic with this kit is only flat down to 16Hz, though, not 10Hz, which isn’t a big deal because the
sweep only goes down to 16Hz anyway. This is probably for the best, as 10Hz is mightily low and may blow some
drivers.
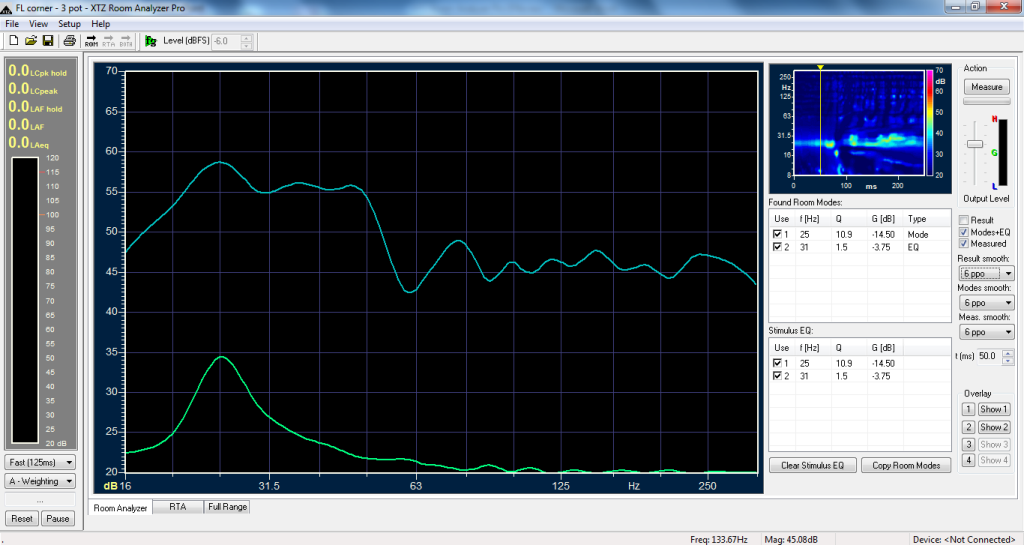
You can see the SPL meter in the screenshot above, on the left side of the image. Notice the useful stats at the
top, which include peak and average values. At the bottom there are adjustments to reset the stats or pause the
meter.
Room Analyzer
The main focus of XTZ Sound’s Room Analyzer II Pro is ... you guessed it ... the Room Analyzer function. It works
by taking a series of measurements using sine sweeps at either a single position or three positions, and then
suggesting filters to compensate for room modes. Before taking any actual measurements, you need to set the
proper output level. This is done by dragging the output level control up or down (look at the top right of the image
below), or adjusting the volume on your receiver, until the level shown is close to the green G. This system worked
really well for me and made it easy to make sure all measurements were taken at an appropriate level.
When performing a 3-position measurement, the software shows a figure indicating that the first measurement be
taken close to the front left speaker, second by the center listening position, and third by the front right speaker.
Note that you can choose whatever positions you like. The marked positions in the figure are simply there to tell
users to move the mic around. In fact, I would typically recommend not following the provided diagram, and instead
focus on the main listening positions. Each position is weighted equally, so if one bad measurement taken away
from the listening area can throw off the results. On a side note, it would also be nice to be able to take
measurements at more than 3 locations, though it’s usually not necessary.