
Installation Guide

Step by Step Installation:
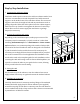
1. Preparing the sink base cabinet
Farmhouse sinks require custom order sink base cabinets with a front
cutout to accommodate a 10 inch deep sink. First, build structural
supports on the inside frame of the sink base cabinet. The structural
supports must bear the weight of sink and any attachments such as
garbage disposals. When the sink is placed onto the cabinet support,
make sure the top of sink is even against the bottom of countertop.
Please allow room for water supply line and drains or garbage
disposal, as necessary.
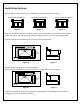
2. Creating the template and cutout
Depending on the installation option, make proper cutout of the
countertop. Ariel recommends a 1/4 inch reveal on 3 sides when
installing undermount style. For a flush mount or above counter
style installation, cut countertop along with outside of sink profile.
Front end of the Ariel Farmhouse sinks are designed to be installed
3/4 inch extended out beyond the front end of countertop. Cut
countertop accordingly and note that no template will be provided
due to the custom nature of each application and installation. The
actual sink is used as the template guide for each installation. After
centering the sink and leaving room for faucets & backsplashes, use
a pencil to outline the sinks as your guide for the cutout, allowing
for any reveal before the actual cutting.
3. Setting the sink
Set the sink on top of the cabinet or into the cabinet front cutout.
Apply sealant if necessary as a gasket between the sink and cabinet.
4. Installing the countertop
Carefully clean bottom of countertop and top flange of the sink with
denatured alcohol. Apply bead of silicone adhesive (not supplied)
around the top edge of sink. Place countertop onto the sink. Remove
excess sealant from the lip of any surfaces with a cleaner recommended
by manufacture of adhesive sealant.
2