SWITCHMAN-3 USER MANUAL Version 3.
1. Product Brief The SwitchMan-3 system is a switching control center. The complete system consists of the Main Unit and a wired Remote. All user controls and displays are on the Remote. The Remote draws power from the Main Unit. The following list summarizes features of this product: • • .
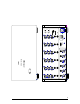
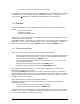
PUSH CH 1 CH 1 CH 2 CH 2 CH 3 emm Labs CH 3 meitnerdesign SWM3 CH 5 CH 6 CH 4 O U T P U T S REMOTE CH 5 CH 4 CH 6 SWM-3 5000 SERIAL MADE IN CANADA MODEL emmLabs PUSH PUSH PUSH PUSH PUSH PUSH PUSH PUSH PUSH PUSH PUSH PUSH PUSH PUSH PUSH PUSH PUSH UNBAL BAL UNBAL BAL I N P U T S 115 V 45 VA 50 / 60 Hz INTERNALLY SET FOR SYS D SYS C SYS B SYS A
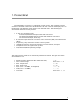
2. Getting Started Caution Before turning this unit on, you MUST verify that the system is set for the correct AC Mains voltage in your area. The factory set voltage is indicated on the back of the unit. 1.1 Quick Set-up Main Unit has one port dedicated to the connection with the Remote. Look for DB-9 modular connectors on the back panels of both units. The Remote is powered from the Main Unit.
- none of the channels is mute (all Input Systems) SwitchMan-3 uses a nonvolatile memory (NVRAM) to store Template files. A template is a data file that saves system settings. The NVRAM contains six templates. In a new system, all templates are initialized to default values, as listed above. 1.2 Operation From a user standpoint, the SwitchMan-3 system operates in three fundamental modes: - Volume Control Mode - Channel Trim Mode - Template Load/Save Mode.
In Volume Control Mode no changes can be made to channel settings - when a channel button is pressed, the settings are viewed only. If no other buttons are pressed at this time, the system will wait 4 seconds, then restore the main display (Master Volume step shown again) and turn off the channel LED indicator. To modify a channel setting, please switch to the Trim Mode first. 1.2.2 Channel Trim Mode The Trim Mode enables modifications to channel Level Trim and channel Mute status.
Press TMPL button to switch to Template Mode – a yellow LED indicator above the button should be lit. At this point you can return to Volume Control Mode (press TMPL again) or select a template using buttons 1 to 6 on the right side of the Remote. Channel buttons double as template selectors. The System will wait for a template selection for approx. 4 seconds. If a selector key is not pressed during that time, the SwitchMan will return to Volume Control mode.
3. Special Features 3.1 Channel Solo Channel Solo, when engaged, temporarily mutes all but one selected channel. The Channel Solo is being engaged from Volume Control Mode. Press the SHIFT (black) key on the back of the Remote, and then one of the channel buttons 1 to 6. The LED indicator for the selected channel will blink. This channel stays on. Press another channel button (without the SHIFT) to move the SOLO to the other channel.
4. Hints and Tips • Selecting another input (A to D), or reselecting the current input again, immediately puts the system into Volume Control Mode, thus escaping any other mode the system is currently in. • When inspecting settings of a given channel, you may choose to adjust that channel right away. Press the TRIM button at this point - the channel selection stays the same, but now the system is in Channel Trim Mode.
Warranty EMM Labs warrants the SWM-3 product against defects in material and workmanship under normal use and service for a period of time specified by the product’s serial number from the date of first delivery to the owner. The warranty time period is 5 years limited to the original owner. EMM Labs will pay for return shipping charges back to the owner when the product is sent to EMM Labs within the first 90 days after purchase.
Appendix A Wiring for ‘REMOTE’ DB9 connector on SWM-3 rear panel in remote control applications via external MIDI devices The SWM-3 can be remote controlled by either the included remote control or by external controllers via the MIDI protocol. It is not possible to use both remote control methods at the same time, since they both use the same connector (REMOTE).