
User Guide


T / TC SET Page 3
Installation Instructions:
EMG Models: T & TC SET
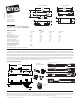
OUTPUT JACK
T
R
S
BOTTOM VIEW
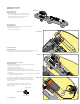
Mounting the Controls:
Refer to Diagram #5
1) Remove the existing controls from the control plate
and mount the EMG controls as shown to the right.
Be sure the PC Board on the switch is facing the
same direction as the diagram shows.
Diagram #5
Plug in the Pickups:
Refer to Diagram #6
1) Plug the Pickup cables onto the switch PC Board as shown.
Neck Pickup to the NEK Input.
Bridge Pickup to the BRG input.
Switch Output Cable;
Refer to Diagram #7
1) Install the 2-pin switch output cable from the switch to the control board.
Also, install the red wire from the switch to the control board.
Diagram #6
Diagram #7
Output Cable and Battery Installation;
Refer to Diagram #8
1) Plug the output cable from the control board to the output jack.
White to the Tip (T) terminal
Black to the Sleeve (S) terminal
Battery Black to the Ring (R) Terminal.
Refer to Diagram #9 for further clarity of the Jack terminals.
2) Plug the Red wire from the battery clip the the terminal on the control board
marked Red.
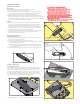
As mentioned before fitting the battery can be a problem. Make sure the battery
fits snuggly, but is easily removable.
This completes the installation, if the Front Pickup was installed
into the body as in Diagram #1, go ahead and string the guitar,
adjust the pickup, then slide the pickguard under the strings and
screw it to the body.
Test the pickups by tapping on them while the instrument is
plugged in, and if everything seems OK, fasten the control
plate and play away.
Diagram #8
Diagram #9