
Network Router User Manual

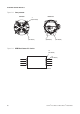
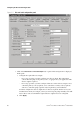
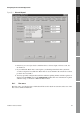

Table Of Contents
- Contents
- Before You Begin
- Installation and Setup
- 2.1 Overview
- 2.2 Installation and setup
- 2.2.1 Ensure required privileges
- 2.2.2 Install the ProLink II software
- 2.2.3 Generate the temporary license
- 2.2.4 Determine your connection type
- 2.2.5 Install the signal converter and connect the wires
- 2.2.6 Configure ProLink II connection parameters and connect to the transmitter
- 2.2.7 Obtain and configure a site key
- 2.3 Troubleshooting the ProLink II installation
- 2.4 Troubleshooting the ProLink II connection
- Using ProLink II Software
- Initial Transmitter Startup Procedures
- Transmitter Configuration, Characterization, and Calibration
- Meter Verification
- Data Logger
- Transmitter Terminal Reference
- Configuring the Discrete Batch Application
- Index

Installation and Use Manual 87
Index Discrete Batch
Appendix B
Configuring the Discrete Batch Application
B.1 About this appendix
This appendix explains how to configure the discrete batch application, and provides basic
information on batch operation.
Note: For more detailed information on operating the discrete batch application, see the
Series 3000 MVD transmitter manual.
Note: The discrete batch application is an optional feature, and may not be installed on your
transmitter. To verify that it is installed, use the Installed Options item on the ProLink II View menu.
Note: For full ProLink II functionality for the discrete batch application, you must connect to the
transmitter using a Modbus connection. If you are using a HART connection, only limited
functionality is available.
B.2 About discrete batching
Discrete batching is used to start flow, then stop flow automatically when the target amount of process
fluid has flowed through the sensor. During a batch, flow may be stopped and resumed. A batch may
also be ended before the target is reached.
B.3 Discrete batch configuration
To configure batching:
1. Open the ProLink II
Configuration window.
2. Click on the
Discrete Batch tab. The panel shown in Figure B-1 is displayed. In this panel:
a. Configure flow source (see Section B.3.1) and click
Apply.
b. Configure control options (see Section B.3.2) and click
Apply.
c. Configure one or more presets, if desired (see Section B.3.3) and click
Apply.
CAUTION
Changing configuration can affect transmitter operation, including batching.
Changes made to discrete batch configuration while a batch is running do not take
effect until the batch is ended. Changes made to other configuration parameters
may affect batching. To ensure correct batching, do not make any configuration
changes while a batch is in progress.