
Network Router User Manual

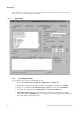
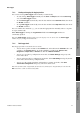

Table Of Contents
- Contents
- Before You Begin
- Installation and Setup
- 2.1 Overview
- 2.2 Installation and setup
- 2.2.1 Ensure required privileges
- 2.2.2 Install the ProLink II software
- 2.2.3 Generate the temporary license
- 2.2.4 Determine your connection type
- 2.2.5 Install the signal converter and connect the wires
- 2.2.6 Configure ProLink II connection parameters and connect to the transmitter
- 2.2.7 Obtain and configure a site key
- 2.3 Troubleshooting the ProLink II installation
- 2.4 Troubleshooting the ProLink II connection
- Using ProLink II Software
- Initial Transmitter Startup Procedures
- Transmitter Configuration, Characterization, and Calibration
- Meter Verification
- Data Logger
- Transmitter Terminal Reference
- Configuring the Discrete Batch Application
- Index

Installation and Use Manual 77
Meter Verification Transmitter TerminalsData LoggerTransmitter Configuration
Chapter 7
Data Logger
7.1 Overview
The Data Logger tool allows periodic logging of user-selected meter data, including process variables,
diagnostic variables, and output levels. Data logged via Data Logger can be viewed or imported into
external programs such as spreadsheets for further analysis.
7.2 Using Data Logger
The Data Logger screen is shown in Figure 7-1.
To set up data logging, you must define the log file, specify the type of data to be logged and the
frequency of data points, and start the logging process.
7.2.1 Defining the log file
To define the log file:
1. Click the
File Type radio button to specify the log file format. Options include:
•
.txt – standard text file
•
.csv – comma separated values, for import into standard spreadsheets
•
.dif – data interchange format, for import into standard spreadsheets
2. Enter the name for the log in the
Filename textbox.
3. Click the
... button to bring up a file browser and specify the location where the log will be
saved.
4. Specify
Update Rate and unit to control the frequency of data points in the log.
Note: If you are using HART protocol, be careful not to set Update Rate too high. On HART/Bell 202,
Micro Motion suggests logging as few variables as possible, and setting the update rate to 5–10
seconds (50000–10000 msec). The same restrictions apply to HART/RS485 at lower baud rates,
especially 1200 baud.
5. Use the
Status Error Logging checkbox to specify whether status errors will be written to the
log.
6. Use the
Log On radio buttons to specify how the data will be logged:
• To log only when variable values change, select
Device Data Change. An initial value
will be logged for each variable as soon as the logging is started, but subsequent data
points will be logged only if the values change. If process variables are stable, no data will
be recorded.
• To log data continuously irrespective of whether process data change or not, select
Time
Interval
. Data will be logged continuously according to the time interval set in the Update
Rate
textbox.