
Network Router User Manual

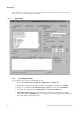

Table Of Contents
- Contents
- Before You Begin
- Installation and Setup
- 2.1 Overview
- 2.2 Installation and setup
- 2.2.1 Ensure required privileges
- 2.2.2 Install the ProLink II software
- 2.2.3 Generate the temporary license
- 2.2.4 Determine your connection type
- 2.2.5 Install the signal converter and connect the wires
- 2.2.6 Configure ProLink II connection parameters and connect to the transmitter
- 2.2.7 Obtain and configure a site key
- 2.3 Troubleshooting the ProLink II installation
- 2.4 Troubleshooting the ProLink II connection
- Using ProLink II Software
- Initial Transmitter Startup Procedures
- Transmitter Configuration, Characterization, and Calibration
- Meter Verification
- Data Logger
- Transmitter Terminal Reference
- Configuring the Discrete Batch Application
- Index

Installation and Use Manual 75
Meter Verification
Meter Verification Transmitter TerminalsData LoggerTransmitter Configuration
This report contains all the information supplied in the Test Definition panel, as well as information
about the meter's configuration and operating conditions during the test. It indicates:
• If the meter has passed or failed the meter verification test
• If the Configuration Changed indicator was activated
• If the Zero Changed indicator was activated
• The number of meter verifications that have been performed on this meter
In addition, the graph showing the current and previous test results is included.
From this panel, you can:
• Print the report
• Save the report to a file
• Save test results to the meter verification test database
• Discard test results
To print the report, click
Print Report. The report is sent to the default printer defined in your
computer's system settings.
To save the report, click
Save Report. It will be saved to disk as an HTML file, using the file name
and location that you specify.
Note: The Save Report button allows you to save the displayed report, but it does not save the test
data. To save the test data, you must click Finish as described below.
To save test results to the meter verification test database and close the Meter Verification dialog,
click
Finish. The test results will be saved in a database on the computer on which ProLink II is
installed.
To discard current test results and close the Meter Verification dialog, click
Cancel. The results of the
current test will be discarded and will not appear on the graph in subsequent meter verification tests.