
Network Router User Manual

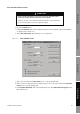

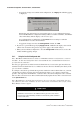
Table Of Contents
- Contents
- Before You Begin
- Installation and Setup
- 2.1 Overview
- 2.2 Installation and setup
- 2.2.1 Ensure required privileges
- 2.2.2 Install the ProLink II software
- 2.2.3 Generate the temporary license
- 2.2.4 Determine your connection type
- 2.2.5 Install the signal converter and connect the wires
- 2.2.6 Configure ProLink II connection parameters and connect to the transmitter
- 2.2.7 Obtain and configure a site key
- 2.3 Troubleshooting the ProLink II installation
- 2.4 Troubleshooting the ProLink II connection
- Using ProLink II Software
- Initial Transmitter Startup Procedures
- Transmitter Configuration, Characterization, and Calibration
- Meter Verification
- Data Logger
- Transmitter Terminal Reference
- Configuring the Discrete Batch Application
- Index

Installation and Use Manual 45
Initial Transmitter Startup Procedures
ProLink II Setup Transmitter StartupUsing ProLink IIBefore You Begin ProLink II Setup Transmitter StartupUsing ProLink IIBefore You Begin ProLink II Setup Transmitter StartupUsing ProLink IIBefore You Begin ProLink II Setup Transmitter StartupUsing ProLink IIBefore You Begin
Figure 4-2 ProLink II – Loop test procedure
Test
Fix Milliamp 1
Fix Milliamp 2
ProLink Menu
Fix Freq Out Read Discrete InputFix Discrete Out 1
Fix Discrete Out 2
Enter pulses/second
(Hz) value
Toggle remote input
device
Read output at
receiving device
Read output at
receiving device
Loop test successful
UnFix
Check output wiring
Troubleshoot output
Correct?
Read output at
receiving device
ON or OFF
Verify reading at
transmitter
Enter mA value
Ye s No output
Correct?
Fix FrequencyFix mA
Fix Discrete Output
Correct? Correct?
Loop test successful Check input wiring
Troubleshoot remote
device
Ye s No input
Read Freq Input
Read frequency at
remote device
Verify reading at
transmitter
Correct?