
Network Router User Manual
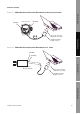


Table Of Contents
- Contents
- Before You Begin
- Installation and Setup
- 2.1 Overview
- 2.2 Installation and setup
- 2.2.1 Ensure required privileges
- 2.2.2 Install the ProLink II software
- 2.2.3 Generate the temporary license
- 2.2.4 Determine your connection type
- 2.2.5 Install the signal converter and connect the wires
- 2.2.6 Configure ProLink II connection parameters and connect to the transmitter
- 2.2.7 Obtain and configure a site key
- 2.3 Troubleshooting the ProLink II installation
- 2.4 Troubleshooting the ProLink II connection
- Using ProLink II Software
- Initial Transmitter Startup Procedures
- Transmitter Configuration, Characterization, and Calibration
- Meter Verification
- Data Logger
- Transmitter Terminal Reference
- Configuring the Discrete Batch Application
- Index

Installation and Use Manual 33
ProLink II Setup Transmitter StartupUsing ProLink IIBefore You Begin
Chapter 3
Using ProLink II Software
3.1 Overview
This chapter provides information on the ProLink II user interface, including:
• Starting ProLink II and connecting to a transmitter (see Section 3.3)
• The ProLink II help system (see Section 3.4)
• Viewing installed options (see Section 3.5)
• Viewing process data (see Section 3.6)
• Viewing and resetting totalizers and inventories (see Section 3.7)
• Viewing status and alarms (see Section 3.8)
• Managing the ProLink II license (see Section 3.10)
3.2 ProLink II user interface
ProLink II software is designed to be easy to use in a Windows environment. ProLink II uses standard
Windows methods for viewing and selecting options.
3.3 Startup
ProLink II can be started from the Windows Start menu, where it is usually found in the MMI
program group. You can also define a desktop shortcut for running ProLink II.
When ProLink II first starts up, the ProLink II main screen and
Connect dialog box are displayed
(see Figure 3-1). Until you connect to a transmitter, most of the menu options are disabled.