
Application Guide


Section 5876 Installation Instructions
Issue AT, April 26, 2013 Spec. No. 582140000 (Models 802
NLDB, 802NLEB and 802NL-B)
Page 5-18 Chapter 5. Installing the Rectifiers and Initially Starting the System
This document is property of Emerson Network Power, Energy Systems, North America, Inc. and contains confidential and proprietary information owned by Emerson Network Power, Energy
Systems, North America, Inc. Any copying, use, or disclosure of it without the written permission of Emerson Network Power, Energy Systems, North America, Inc. is strictly prohibited.
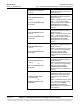
NO TEMPERATURE
COMPENSATION
or
TURN OFF POWER SHARE
or
TEMPERATURE SLOPE
= 0.vvvV/°C/F
Allows you to enable the Battery
Charge Temperature Compensation
feature and set the Battery Charge
Temperature Compensation Slope
set point, or disable the feature.
Note: To disable the feature, press
NO / - when in the change setting
mode to scroll to NO
TEMPERATURE COMPENSATION
(displayed when you scroll down to
"0V / °~").
Note: This is the voltage slope of
the entire battery string, not
individual cells.
Note: The Temperature
Compensation feature requires
Power Share to be turned off. A
message is displayed if Power
Share is on.
MAXIMUM COMPENSATION
= vv.vvV
Allows you to change the Maximum
Voltage with Temperature
Compensation set point.
MINIMUM COMPENSATION
= vv.vvV
Allows you to change the Minimum
Voltage with Temperature
Compensation set point.
IT IS NOW hh:mm:ss
dd-mon-yy
Allows you to change the time and
date.
READY TO START THE
SYSTEM NOW?
Allows you to start the system with
the selected settings.
1. Press ENTER and ALARM
CUTOFF (at the same
time).
2. At the "ARE YOU SURE?"
prompt, press YES / + / i.
Table 5-2
MCA Settings
Checking the Inventory and Setting the Number of
PCU (Rectifier) Positions Available in the System
Procedure
1) With SYSTEM OK being displayed on the MCA Interface Pad, press and release
the FUNCTION SET ENTER key.
2) Repeatedly press and release the FUNCTION SELECT DOWN arrow key until
VIEW THE SYSTEM INVENTORY is displayed.
3) Press and release the FUNCTION SET ENTER key.
4) Repeatedly press and release the FUNCTION SELECT DOWN arrow key until
## PCU POSITIONS ARE EMPTY is displayed.
5) Press and release the ALARM CUTOFF and FUNCTION SET ENTER keys
simultaneously. Line 2 of the display is replaced by "CHANGE THE VARIABLE".