
User manual


Local and Server Notification Configuration
42
11.3.2 SNMP Set Request
To set up an SNMP set request to control a device:
• Log on as Administrator and click on the Configure tab.
• In the left side of the window, double-click on Local and Server Notifications, then on
Advanced Notification and finally on SNMP Set Request.
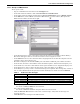
•In the File menu, click on New. (Or click the New button on the toolbar.) This opens the
SNMP Request Setup window, shown below right.
• In the Description box, enter a descriptive name for the action—for example, Turn On Unit.
• Choose a device from the Managed Devices drop-down list. All available data for the selected
device appears in the Data Points box.
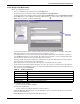
• Choose items you want the Data Points box using click-and-drag:
• Click on an item in the Data Points box at left. Details are displayed below the box.
• Drag the highlighted item to the Selected Data Points box at right.
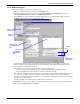
• For each item in the Selected Data Points box, click in the Set Value box at bottom right and enter
the value. For an explanation of acceptable values and their effects, refer to the Explanatory
Information directly below the Set Value box—for example, “Setting this object to 0 will cause the
startup to occur immediately.”
• Continue adding data points for this or other devices as desired.
•Click OK to save the request. The next step is to link the request to an alarm for a specific device
(see 11.2.4 - Assign Actions to Alarms).
Set Value
box
Explanatory
Information
Click on an item
in the Data Points
box . . .
. . . and drag to
the Selected
Data Points
box
Enter
description
Select
device