
User manual


Local and Server Notification Configuration
37
11.2.1 Set Up an E-Mail Action
To set up an e-mail:
• Log on as Administrator and click on the Configure tab.
• In the left side of the window, click on Local and Server Notifications.
• In the right side of the window, double-click on Server Notifications, then on Email Actions.
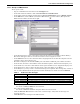
•In the File menu, click on New. (Or click the New button on the toolbar.) This opens the
Email Actions window, shown below right.
• In the Description box, enter a descriptive name for the action—for example, UPS On Battery.
This name will appear later in a list of actions that can be assigned to events.
• In the SMTP Server box, enter the name of the outgoing mail server that this computer uses for
outgoing e-mail—mail.company.com.
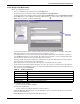
• The Port box displays the standard SMTP port of 25. Enter a different port number if needed.
• In the To box, enter the e-mail address of the intended recipient—Administrator@company.com.
• In the From box, enter the e-mail address where replies should be sent—Support@company.com.
• In the Subject box, enter a subject for the e-mail—Store 112 Nfinity is On Battery.
• In the Body box, you may create a customized message for recipients. The message may consist of
text as well as fields from the drop-down list below the Body box, which are listed in Table 9.
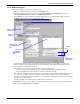
For example, if you enter:
An alarm in $DEV_NAME$ has been detected.
the e-mail message might read:
An alarm in GXT 2U 2nd Floor Computer Room has been detected.
•Click the Execute Test button to send a test e-mail message. Verify that the message was
received correctly.
•Click OK. This saves changes to the Email Action.
Table 9 Fields for e-mail messages
Field Description
$REC_UTC$ The time when the alarm was received
$ADDRESS$ The IP address of the device that sent the alarm
$DEV_NAME$ The user-defined name of the device that sent the alarm
$EVENT_MESSAGE$ The alarm message—for example, High Temperature, Low Temperature or On-Battery
$EVENT_OID$ The SNMP object-Identifier number