
User Guide


4
INSTALLATION AND START-UP
Unpack and Inspect the 3U POD
1. Unpack the 3U POD carefully, noting the packing method. Retain the box and packing
material for possible future shipments.
2. Visually inspect the 3U POD for freight damage. Report damage to the carrier and your
local dealer or Liebert representative.
3. Verify that the 3U POD input cord, UPS input cord, and receptacle for the UPS have the
same type of configuration.
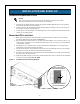
Mount the POD in the Rack
1. Rack mount installation of the 3U POD is possible with the use of the rack mounting
brackets (shipped with the POD). See Figure 4.
2. The rack mount brackets allow you to rack mount the POD in a 19" enclosure (23" to 19"
rack adapters would have to be purchased separately if you are using our 23" Foundation
or equivalent cabinet).
3. The POD can be mounted to face one of four directions depending on your application,
utilizing the rack mount brackets provided.
4. Attach the brackets to the POD first with the screws provided (three screws per bracket),
making sure to face the POD in the desired direction first.
5. Consult your rack/enclosure manufacturer’s recommendations for specific rack mounting
hardware that will be required.
6. Tighten the POD securely to the rails, and then follow the start-up directions for the POD
in the next section, Start Up the POD.
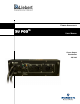
Figure 4 3U POD with rack mounting brackets
NOTE
This manual provides instructions for the 3U POD only. Refer to your UPS
manual for UPS operation and installation instructions.
Rack
mounting
brackets
The POD may be faced in
any of four directions
Side view of POD
with mounting bracket