
User Guide


5
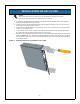
6. Next attach the POD to the securing brackets (see Figure 5). The POD can be installed to
face one of three different directions utilizing the same mounting procedures.
Figure 5 Attaching POD to securing brackets
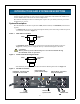
7. Make sure the 2U POD rotary switch is in the UTILITY position. Plug the 2U POD input
cord (labeled “UTILITY”) into the utility outlet (wall receptacle).
WARNING: The 2U POD is now electrically live. The UTILITY lamp (orange) should now
be illuminated.
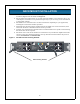
8. Plug the UPS input cord into the receptacle on top of the 2U POD labeled “CONNECT
UPS LINE CORD HERE.”
WARNING: The UPS system is now electrically live.
9. Connect the 2U POD UPS output cord (labeled “CONNECT TO UPS OUTPUT
RECEPTACLE”) to the output of the UPS system.
10. Plug in all loads to the output distribution receptacles, evenly distributing them on the
2U POD. The 2U POD now powers your equipment in the UTILITY mode.
11. Turn ON the loads and ensure all are up and operating according to specification.
12. Start the UPS according to its specific user manual.
13. Verify that the UPS lamp (green) on the 2U POD is illuminated. If so, transfer the rotary
switch from UTILITY to UPS. The load is now being supplied with conditioned power
through the UPS.
14. Before any operation or procedure, always verify that both the UPS lamp (green) and the
UTILITY lamp (orange) are illuminated before changing the status of the rotary switch.