
Owner`s manual


Property Damage: Do not pinch or break copper
tubing. Do not distort the last 1 inch of tubing.
Make sure to use rubber gasket
to ensure proper seal.
2
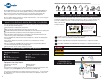
B
A
■
Unpack dispenser components.
■
On a firm, flat surface, carefully
straighten the copper tubing.
■ Ensure that the black rubber gasket
is properly seated into the base of
the dispenser head and will
surround the sink mount.
■ Feed tubes down the hole in the
sink or countertop until the base is
at rest on the sink or countertop
surface.
■ From under the sink, place the
semi-circular mounting plate onto the
threaded stud.
■ Place wing nut onto the threaded
stud. Make sure faucet head is at the
desired angle. Tighten the wing nut
until snug, while ensuring the semi-
circular mounting plate extends
beyond the sink hole.
An assistant may be needed to hold
the dispenser head in place
while securing the dispenser.
C
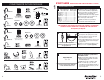
INSTALLING THE FAUCET - H990
H990
H990
H990
Wing Nut
Fiber
Washer
■
Unpack dispenser components.
■
On a firm, flat surface, carefully
straighten the copper tubing.
■ Remove the wing nut from
the valve body.
View/Wave/HC3/GN3
For counters less than 3/4
"
thick
(Fig. 1)
■ Slide 2
1
⁄4" fiber washer over faucet
threads under sink. Tighten assembly
using black plastic wing nut.
For counters more than 3/4
"
thick
(Fig. 2)
■ Thread extension (only included with
View/Wave) onto base of faucet
until tight. Slide 2
1
⁄4" fiber washer
over extension under sink. Tighten
assembly using plastic star nut.
■ Feed tubes down through the hole
in the sink or counter until the base
is at rest. Set faucet at desired angle.
Hot & Cool models only
■ Remove plug from the Y-shaped
quick-connector by depressing
release ring. Attach the quick
connector to the ends of the copper
tubes running from the dispenser.
■ Install a white 3/8" tube into
quick connector.
Property Damage: Do not over tighten
the plastic wing nut
.
An assistant may be needed to hold
the dispenser head in place
while securing the dispenser.
2
A
C
D
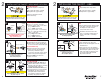
View/Wave/HC3/GN3
View/Wave/HC3/GN3
Property Damage: Do not pinch or break copper
tubing. Do not distort the last 1 inch of tubing.
INSTALLING THE FAUCET - VIEW/WAVE/HC3/GN3
Hot & Cool models only
Star Nut
Fiber
Washer
Fig. 1
Fig. 2
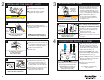
6
7
1
1
⁄4" Hole
Cast Iron or
Hole larger than 1
1
⁄4"
■ For a 1
1
⁄4" sink hole, stack the
washers in this order on sink deck:
1) 1
5
⁄8" rubber washer
2) 1
5
⁄8" small steel washer.
■ For a cast iron sink, or a hole larger
than 1
1
⁄4", stack the washers in this
order on sink deck:
1) 2
1
⁄4" large steel washer
2) 1
5
⁄8" rubber washer
3) 1
5
⁄8" small steel washer
B
View/Wave/HC3/GN3
BOTH 1
5
⁄8" small steel and rubber washers
MUST BE INSTALLED to ensure
proper operation and seal.
1
5
⁄8" Small
Steel Washer
1
5
⁄8" Small
Steel Washer
2
1
⁄4" Large
Steel Washer
1
5
⁄8" Rubber
Washer
1
5
⁄8" Rubber
Washer