
Instruction Manual

Instruction Manual
D101957X012
V150 and V300 Valves
November 2011
11
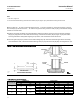
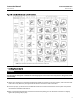
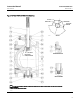
Figure 6. Flow Ring Construction
SEAL
PROTECTOR
RING
E0849
D Install the HD metal seal (key 11) into the seal protector ring (key 3), past the radial seal. While pushing it past the
radial seal, make sure the HD metal seal is level.
D To assist with break-in of the HD metal seals, it is recommended that the ball and seal be lubricated. Apply dry film
lubricant to the seat of the HD metal seal (key 11) and to the face of the ball.
Note
During break-in, if the Vee-Ball rotation is not smooth, it may be necessary to tighten the packing slightly to dampen any tendency
for stick-slip motion of the ball and seal assembly.
5. Install the HD metal ball seal/seal protector ring assembly into the valve body (key 1). Go to step 6 below.
6. Install the retaining screws (key 21) that secure the seal protector ring (key 3) to the valve body (key 1). Tighten the
screws (key 21).
7. If necessary, refer to the Packing Maintenance procedures to install the packing. Install the actuator using the
Actuator Mounting procedures or to the appropriate actuator instruction manual.
Bearing and Ball Maintenance
Procedures for disassembly and assembly of the bearings and ball cannot be accomplished until the ball seal and valve
packing are loosened.
D Refer to the Packing Maintenance procedures to remove the actuator.
D Refer to the Ball Seal Replacement procedures to remove the seal from the valve.
D Install an ``eye'' bolt into the threaded hole within the ball cavity (see figure 10). (Note: The eye bolt provides a
method for lifting and controlling the rotation of the ball during the following procedures. (Read the following
Warning.)
D When ball seal disassembly steps are complete, return to this section.
If you have not already done so, place the valve on a flat protected working surface with the seal side down, prior to
removing and installing the ball and bearings. Key numbers in this procedure are shown in figure 10, unless otherwise
indicated.