
Instruction Manual
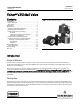


Instruction Manual
D100422X012
V250 Valve
September 2013
10
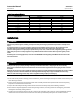
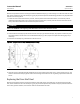
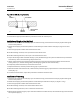
Figure 6. Seal & Backup Ring Assembly
28B2099
SEAL
CARRIERS
BACK-UPRING
INTERNAL
PRESSURE
SPRING LOADED
SEAL RING
5. Proceed to the appropriate Installation procedure to install the removed parts.
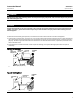
Installation of Single or Dual Ball Seal
1. Check the seal surface of the valve (key 1) for scratches that may prevent the shim seals (key 10) from sealing off
internal valve pressures.
2. Rotate the ball (key 2) to the closed position as indicated by the travel indicator scale (key 37, figures 10 and 11
only).
3. Placetheappropriatenumberofshimsealsintothevalve:
D For NPS 4 through 10 valves, insert up to 6 shim seals i nto the valve.
D For NPS 12 through 24 valves, insert up to 7 shim seals into the valve.
4. Inspect the sealing surface of the ball seal (key 11) for possible damage. Then place the ball seal on top of the shim
seals with any nicks or scratches facing away from the ball.
5. Add or remove the 0.25 mm (0.010 inch) thick shim seals to the valve until the ball seal firmly contacts the ball
sealing surface (i.e., without rocking) when pressed tightly against the shim seal assembly.
6. Temporarily remove the ball seal, and remove 3 shim seals.
7. Replace the ball seal, and then place the O-ring (key 13) into the valve.
8. With the ball seal centered on the ball, install the seal protector ring (key 14) and secure it to the valve with the cap
screws (key 15).
9. For dual s eal constructions, repeat this procedure on the other end of the valve.
Installation of Flow Ring
1. Check the seal surface of the valve (key 1) for scratches that may prevent the shim seals (key 10) from sealing off
internal valve pressures.
2. Rotate the ball (key 2) to the closed position as indicated by the indicator scale (key 37, figure 11 only).
3. Placetheappropriatenumberofshimsealsintothevalve:
D For NPS 4 through 10 valves, insert 6 shim seals into the v alve.
D For NPS 12 through 24 valves, insert 7 shim seals into the valve.
4. Making certain the flow ring (key 14) is centered and does not contact the ball, secure the flow ring to the valve with
the cap screws (key 15).