
Instruction Manual


Instruction Manual
D100394X012
EH (1-1/2x1 through 8x6)
December 2014
21
Secure with the retaining ring (key 10). For an NPS 6 valve with a level D Whisper Trim III cage, reinstall the piston ring
(key 30) following the instructions given in the paragraph immediately preceding.
2. Install the valve plug into the cage.
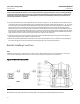
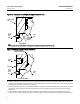
TSO Trim
Refer to figure 7.
1. Thread the outer plug onto the inner plug until the parts seat metal t o metal, using a strap wrench or similar tool
that will not damage the outer plug guide surfaces.
2. Mark the top of the inner plug and outer plug with alignment marks in the assembled position.
3. Disassemble the outer plug from the inner plug and install the seal over the inner plug, so that the seal rests below
the threaded area.
4. Thread the outer plug onto the inner plug and tighten with a strap wrench or similar tool until the alignment marks
line up. This will ensure that the plug parts are metal to metal and the seal is compressed properly. Do not damage
the outer plug guide surfaces.
5. Install set screws centering the inner plug in the outer plug and torque to 11 NSm(8lbfSft).
6. Assemble the piston ring, anti-extrusion rings, backup ring, and retainer.
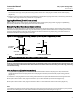
All Constructions
1. Install the top cage gasket (key 11) on the cage.
2. Install the bonnet over the valve stem and onto the valve body.
Note
The prelubricated hex nuts (key 14, figure 17, 18, or 20) referred to in step 3 can be identified by a black film coating on the nut
threads.
The proper bolting procedures in step 3 include--but are not limited to--ensuring that the bonnet stud threads are clean, Belleville
washers (if present) are installed in the correct orientation, and that the hex nuts are evenly tightened to the specified torque
values.
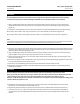
CAUTION
Failure to comply with good bonnet-to-body bolting practices and the torque values shown in table 8 may result in cage
crushing, cage diameter reduction, and/or bonnet deformation. Cheater bars or slug wrenches should not be used for this
procedure.
Hot torquing is not recommended.
Note
Stud(s) and nut(s) should be installed such that the manufacturer's trademark and material grade marking is visible, allowing easy
comparison to the materials selected and documented in the Emerson/Fisher serial card provided with this product.
WARNING
Personal injury or damage to equipment could occur if improper stud and nut materials or parts are used. Do not operate or
assemble this product with stud(s) and nut(s) that are not approved by Emerson/Fisher engineering and/or listed on the