
Instruction Manual


Instruction Manual
D100394X012
EH (1-1/2x1 through 8x6)
December 2014
20
CAUTION
Hold the torque wrench at right angles to the seat ring retainer when applying torque. Tilting the tool and extension while
applying torque may cause the lugs on the seat ring retainer tool to suddenly disengage from the recesses in the retainer,
damaging the retainer and seat ring.
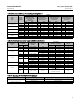
e. Tighten the seat ring retainer to the torque shown in table 9.
Note
Some cages have one large window and several small windows. In step 2, install a cage that has different size windows so that the
largest window faces toward the process outlet for a flow-down and toward the process inlet f or a flow-up valve. Though it may
not be possible to align the large window directly opposite the inlet or outlet, orient the window in the appropriate direction as
much as possible. Incorrect orientation of cage windows causes a reduction of capacity.
2. Proceed as appropriate:
For a valve with a Cavitrol III cage, slidetheO-ring(key26,figure21)overtheseatring(key6)andagainstthe
shoulder in the outer diameter of the seat ring. Install the lower gasket (key 11) between the valve body and cage (key
2),andinstallthecage.Becertainthelugsonthebottomofthecageengagethecorrespondingslotsintheseatring
retainer.
Forallothervalves,install the lower gasket (key 11) between the valve body and cage (key 2), and install the cage. Be
certain the lugs on the bottom of the cage engage the corresponding slots in the seat ring retainer.
Note
Rotate the cage clockwise by hand as much as possible once the cage lugs engage the slots in the seat ring retainer. Failure to do
so may result in leakage at the seat ring to valve body seal.
Constructions other than TSO trim
1. To install the piston rings and seal rings (keys 8 and 30), proceed as appropriate:
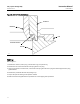
For an EHD valve (figure 17), if it is necessary to install new piston rings, the replacement piston rings will arrive in one
piece. Use a vise with smooth or taped jaws to break a replacement piston ring into halves. Place the new ring in the
vise so that the jaws compress the ring into an oval. Compress the ring slowly until the ring snaps on both sides. If one
side snaps first, do not try to tear or cut the other side. Instead, keep compressing until the other side snaps. The
piston ring can also be fractured by scoring and snapping over a hard surface such as a table edge. Sawing or cutting is
not recommended.
Remove any protective tape or c overing from the valve plug and stem assembly, and set i t on a protective surface.
Then, place the piston ring in the piston ring groove with the fractured ends matched.
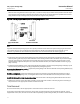
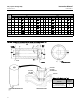
For an EHT valve (figure 20), install the seal ring (key 8) onto the valve plug (key 3). Install the ring with the open side
facing the seat ring end of the v alve plug for flow-down applications (view A of figure 20) or with the open side facing
the valve plug stem end of the valve plug for flow-up applications. Slide the backup ring (key 9) onto the valve plug.