
Instruction Manual


Instruction Manual
D100394X012
EH (1-1/2x1 through 8x6)
December 2014
17
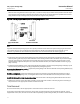
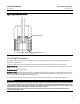
Figure 8. Trim Surfaces Requiring Lubrication
SEAT RING RETAINER
A3583
SEAT RING GASKET OR O-RING
SEAT RING
VALVE BODY
LUBRICATION REQUIRED
1
1
1
CAUTION
Thoroughly clean the seat ring (key 6), seat ring retainer (key 7), and the retainer threads in the valve body with a
good-quality degreaser. Also clean all cage gasket surfaces. All residual gasket material must be removed from the cage
gasket surfaces and, in gasketed seat ring constructions, from the serrated valve body and seat ring gasket surfaces. If the
serrations are scored or damaged during this process, smooth them by hand sanding with 360 grit paper using long,
sweeping strokes. Failure to remove all residual gasket material and/or burrs from the seat ring, cage, and valve body
gasket surfaces will result in leakage.
Thoroughly lubricate the surfaces indicated in figure 8 with the appropriate lubricant shown in table 11. Be certain t o
lubricate the mating surfaces of both parts involved (i.e., lubricate the threads on the seat ring retainer and the threads in
the valve body; lubricate the mating surfaces of the seat ring retainer and seat ring).
Failure to lubricate as described may cause galling and improper gasket or O-ring (key 12) loading that may result in
leakage.
1. For gasketed seat ring constructions, install the seat ring gasket (key 12) into the valve body. For O-ring seat ring
constructions, install the O-ring (key 12) into the groove on the underside of the seat ring (key 6). Install the seat
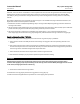
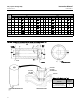
ring (key 6). Screw in the seat ring retainer (key 7). Use the seat ring retainer tool (figure 9) to tighten the seat ring
retainer as follows:
a. Insert the tool into the valve body. Be certain the tool lugs are engaged in the corresponding recesses in the
retainer.
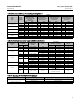
b. Use a power torque wrench or driver having torque capabilities equal to or greater than those shown in table 9.
Connect the torque tool to an extension if necessary. The tool or extension must snugly fit the square hole in the
seat ring retainer tool. Refer to figure 9 for square hole sizes.
c. Insert the tool or extension into the square hole in the seat ring retainer tool.
d. Use the stud bolts (key 13) to prevent a power torque wrench from rotating.