
Instruction Manual


Instruction Manual
D100394X012
EH (1-1/2x1 through 8x6)
December 2014
16
3. Thread the new stem into the valve plug and tighten it to the appropriate torque value given in table 10. Using the
valve plug pin hole as a guide, drill the pin hole through the stem. Refer to table 10 for drill sizes.
4. Drive in the pin to lock the assembly.
5. If it is necessary to lap the seating surfaces, complete the Lapping Seats procedure before installing the EHD piston
rings or the EHT seal ring. The Trim Replacement procedure provides piston ring and seal ring installation
instructions and valve reassembly instructions.
Lapping Seats
Key numbers referenced in this procedure are shown in figure 17 for the EHD valv e, in figure 18 for the EHS valve, and
in figure 20 for the EHT valve unless otherwise indicated.
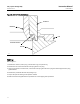
Seating surfaces of the valve plug (key 3) and the seat ring (key 6) can be lapped for improved shutoff. Use a good
quality lapping compound with a mixture that contains 280 to 600 grit. Apply the compound to the bottom of the
valveplug.Usethefollowingproceduretolaptheseatingsurfaces.
1. Install the following parts according to the instructions presented in the Trim Replacement procedure: seat ring
gasket or O-ring (key 12), seat ring (key 6), seat ring retainer (key 7), cage (key 2), cage gaskets (key 11), and if
used, the O-ring (key 26, figure 21).
2. Proceed as appropriate:
For an EHD or EHT valve, install the valve plug and stem assembly (keys 3 and 4)–without piston rings or seal ring (keys
8 and 30)–into the cage.
For an EHS valve, install the valve plug and stem assembly (keys 3 and 4) into the cage.
3. Install the bonnet (key 1, figure 16) over the valve stem, and secure the bonnet with four of the hex nuts (key 14).
4. Attach a handle, such as a piece of strap iron secured by stem locknuts, to the valve stem. Rotate the handle
alternately in each direction to lap the seats.
Note
To preserve the effects of lapping, do not change either the position of the seat ring in the valve body cavity or the position of the
cage on the seat ring after lapping the seating surfaces. If possible, clean the parts without disturbing their positions. If the parts
must be removed for cleaning, return them to the original positions.
5. After lapping, again disassemble as necessary, clean the seating surfaces, reassemble, and test for shutoff. Repeat
the lapping procedure if necessary.
Trim Replacement
After all trim maintenance has been completed, reassemble the valve by following the numbered steps below. Be
certain that all gasketed surfaces have been well cleaned. Key numbers referenced in this procedure are shown in
figure17fortheEHDvalve,infigure18fortheEHSvalve,andinfigure20fortheEHTvalve.