
Instruction Manual


Instruction Manual
D100394X012
EH (1-1/2x1 through 8x6)
December 2014
13
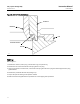
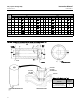
If desired, a tool can also be machined for a valve of specific size and valve class using the dimensions shown in figure
9. Machine the tool from a material listed in figure 9 or from a material with a yield strength of at least 827 MPa
(120,000 psi). Using a tool of lower strength material may result in damage to the seat ring retainer or valve body
threads.
Key numbers referenced in this procedure are shown in figure 17 for the EHD valve, figure 18 for the EHS valve, and
figure 20 for the EHT valve except where indicated.
1. Remove the actuator and bonnet by following steps 1 through 4 of the Replacing Packing procedure. Observe all
warnings and cautions.
2. Lift the valve stem and attached valve plug out of the valve body. If the valve plug is to be reused, tape or otherwise
protectthevalveplugstemandthevalveplug seating surface to prevent scratches.
3. Lift out the cage (key 2) and the top and bottom cage gaskets(key11).ForavalvewithCavitrolIIItwo-or
three-stage cage, also remove the O-ring (key 26, figure 21) that fits between the cage and the seat ring (key 6).
Constructions other than TSO trim
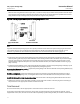
1. Use the seat ring retainer tool (figure 9) to remove the seat ring retainer (key 7) as follows:
a. Insert the tool into the valve body. Be certain the tool lugs are engaged in the corresponding recesses in the
retainer.
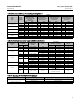
b. Use a power torque wrench or driver having torque capabilities equal to or greater than those shown in table 9.
Connect the torque wrench to an extensionifnecessary.Thetoolorextensionmustsnuglyfitthesquareholein
the seat ring retainer tool. Refer to figure 9 for square hole sizes.
c. Insert the tool or extension into the square hole in the seat ring retainer tool.
d. Use the bonnet studs (key 13) to prevent a power torque wrench from rotating.
CAUTION
Hold the torque wrench or driver at right angles to the seat ring retainer when applying torque. Tilting the tool or
extension while applying torque may c ause the lugs on the seat ring r etainer tool to suddenly disengage from the recesses
in the retainer, damaging the retainer and seat ring.
e. Unscrew and remove the seat ring retainer.
2. Remove the seat ring (key 6) and the seat ring gasket or O-ring (key 12).
3. Refer to the Valve Plug Maintenance procedure or to t he Lapping Seats procedure.