
Instruction Manual


Instruction Manual
D103175X012
GX Valve and Actuator
August 2011
23
f. Clean the body/extension bonnet seating gasket surface and install the gasket (key 5).
g. Install the extension bonnet and plug/stem assembly onto the valve body. Install the body/yoke nuts (key 7) and
tighten evenly using a cross-tightening procedure. See table 4 for torque requirements.
CAUTION
If the packing is to be reused and was not removed from the bonnet, perform the following step carefully to avoid
damaging the packing with the stem threads.
h. Install the bonnet and actuator yoke onto the extension bonnet by completing the assembly according to steps
15 to 27 of the section Replacing Packing, omitting step 16 if new packing is not being installed.
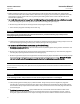
Assembly of Balanced Trim
(Available in DN 80, 100, and 150 [NPS 3, 4, and 6] only)
Refer to figure 10.
CAUTION
To protect the valve plug seal ring (key 37) and to ensure it seals properly, be careful not to scratch the surfaces of t he ring
groove in the valve plug or any of the surfaces of the replacement ring.
1. With the valve plug (key 3) removed according to the Disassembly portion of the Valve Trim Maintenance
procedure, proceed as appropriate:
The seal ring (key 37) cannot be reused because it is a closed ring which must be pried and/or cut from the groove.
Once the seal ring is removed, the elastomeric backup ring (key 38), which is also a closed ring, can be pried from the
groove.
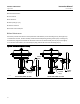
To install a new backup ring and seal ring onto the valve plug, apply a general purpose silicone-base lubricant to both
rings (keys 38 and 37). Place the backup ring over the valve plug (key 3) and into the groove. Place the seal ring over
the top edge of the valve plug (key 3) so that it enters the groove on one side of the valve plug. Slowly and gently
stretch the seal ring and work it over the top edge of the valve plug. The PTFE material in the seal ring must be
permitted time to cold-flow during the stretching procedure, so avoid jerking sharply on this ring. Stretching the seal
ring over the valve plug may make it seem unduly loose when in the groove, but it will contract to its original size after
insertion into the bonnet.
2. Install the seat ring, valve plug/stem, bonnet and actuator yoke into the valve body by completing the assembly
according to steps 1 to 3 of the section Assembly of Unbalanced Trim.
Repair Nameplate
If required by the end-user, an optional repair nameplate is available for recording changes made to the valve trim
during maintenance (see figure 29). This nameplate can be ordered as a spare part, and is easily mounted to the
actuator casing using a casing bolt. (Reference the Parts Ordering section of this manual.)
As shown in figure 29, the repair nameplate provides locations for maintenance personnel to record trim data, such as: