
Instruction Manual


Instruction Manual
D100400X012
EWN and EW-1 Valves
July 2014
8
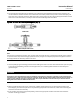
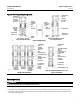
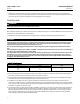
Figure 4. Detail of PTFE/Composition Packing Arrangements
12A8180-A
A1498-2
12A8173-A
A2619
12A8165-A
UPPER WIPER
(KEY 12)
PACKING
FOLLOWER
(KEY 13)
PACKING RING
(KEY 7)
LANTERN
RING (KEY 8)
PACKING BOX
RING (KEY 11)
TYPICAL
(DOUBLE)
ARRANGEMENT
LEAK-OFF ARRANGEMENT
19.1 OR 25.4 mm
(3/4 OR 1 IN.)
STEMS
31.8 mm
(1-1/4 IN.)
STEMS
2. Loosen the packing flange nuts (key 5, figure 6) so that the packing is not tight on the valve stem. Remove any
travel indicator parts and stem locknuts from the valve stem threads.
CAUTION
When lifting the bonnet (key 1, figure 6), be sure that the valve plug and stem assembly remains in the valve and on the
seat. This will avoid damage to the seating surfaces as a result of the assembly dropping from the bonnet after being lifted
part way out. The parts are also easier to handle separately.
3. Unscrew the hex nuts (key 16, figure 7 through 10) that bolt the bonnet and valve body together, and carefully lift
the bonnet off the valve stem.
4. If the valve plug and stem assembly starts to lift with the bonnet, use a brass or lead hammer on the end of the stem
and tap it back down. Set the bonnet on a protective surface to prevent damage to the bonnet gasket surface.
5. Remove the bonnet gasket (key 10, figure 7 through 10), and cover the opening in the valve body to protect the
gasket surface and prevent foreign material from getting into the valve body cavity.
6. Remove the packing flange nuts, packing flange, upper wiper, and packing follower (keys 5, 3, 12, and 13, figure 6).
Carefully push out all the remaining packing parts from the valve body side of the bonnet using a rounded rod or
other tool that will not scratch the packing box wall. Clean the packing box and the metal packing parts.
7. Inspect the valve stem threads and packing box surfaces for any sharp edges that might cut the packing. Scratches
or burrs could cause packing box leakage or damage to the new packing. If the surface condition cannot be
improved by light sanding, replace the damaged parts.
8. Remove the covering protecting the valve body cavity, and install a new bonnet gasket (key 10, figure 7 through
10), making sure the gasket seating surfaces are clean and smooth.