
Instruction Manual

Instruction Manual
D100400X012
EWN and EW-1 Valves
July 2014
13
CAUTION
Never reuse an old stem with a new valve plug. Using an old stem with a new plug requires drilling a new pin hole in the
stem. This weakens the stem and may cause it to fail in service. However, a used valve plug may be reused with a new stem.
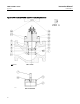
2. Toreplacethevalvestem(key7)onalldesigns,driveoutthepin(key8)andunscrewthestemfromthevalveplug.
3. Tightly turn in the new stem; then refer to table 5 to select the proper drill size. Drill through t he stem, using the
hole in the valve plug as a guide. Remove any chips or burrs, and drive in a new pin to lock the assembly.
Trim Replacement
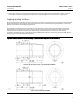
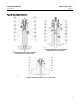
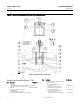
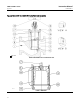
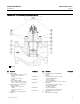
Except where indicated, key numbers are referenced in figures7and8forEWNSeriesconstructionsandinfigures9
and 10 for EW-1 Series constructions.
1. With an EW-1 or EWN-1 Series construction, lubricate the threads of the seat ring (key 9) with anti-seize lubricant
and then install the seat ring into the valve body according to figure 5. Engage the seat ring lugs with the grooved
end of the tool, and then secure the seat ring by slipping a suitable length of pipe through the hole in the other end
to provide leverage. For NPS 8x6 valves, tighten to 6800 NSm (5000 lbfSft). For NPS 12x8 valves, t ighten to 10,800
NSm (8000 lbfSft).
2. With an EWNT-2 construction, turn the seat ring into the cage with a bar inserted through the seat ring slots. Tack
weld the seat ring to the cage using minimal heat. Two welds, 6 mm (1/4 inch) long and 180 degrees apart, are
required. Install the seat ring seal ring (key 6) so that its open side faces along the valve stem as shown in view B of
figure 8. Lubricate the seal ring with a general purpose silicone-base lubricant, and place it over the bottom end of
theseatring.Starttheringinthegrooveononesideoftheseatring,andgentlyworkitovertheseatring.
3. Install a bonnet gasket (key 10) or the cage gasket if used (key 11) into the valve body. Temporarily install screws or
bolts into the tapped holes in the top of the cage or cage assembly (key 3) to help while installing this piece into the
valve body. Any rotational orientation of the cage or assembly with respect to the valve body is acceptable.
Use care to avoid damaging the seat ring seal ring and cage seating surfaces while handling the heavy parts. To help
insertthecageorassemblyintothevalvebody,lubricatetheoutsidediameteroftheseatringsealringifusedorthe
cage/seat ring seating surfaces with a general purpose silicone-base lubricant.
4. Slide the valve plug (key 2) and stem assembly into the cage. Make sure the valve plug piston ring or seal ring (key
5) is evenly engaged in the entrance chamfer at the top of the cage or cage assembly to avoid damaging the ring.
CAUTION
If the packing is to be reused and was not removed from the bonnet, use care when installing the bonnet to avoid
damaging the packing with the valve stem threads.
5. Mount the bonnet on the valve body, and complete assembly according to steps 9 through 13 of the Replacing
Packingsection,omittingsteps10and11ifnewpackingisnotbeinginstalledandbeingsuretoobservethenote
prior to step 9.