
User's Manual

Options—Installation
20
4.8 Cluster Configuration
Two or more Knurr DCM cabinets of the same height can be connected in a cluster with the optional
Cluster Kit of suite brackets and flexible dress strip (24U, Part # 539608G1; 42U, Part # 539608G2;
45U, Part # 539608G3) or with the standard, factory-installed cluster tab. The brackets put the
cabinets on 24" (609.6mm) centers, which matches the size of U.S. floor tiles, enhancing integration
with underfloor cooling systems. The bracket and plastic strip serve as finishing pieces and close the
gap between the cabinets.
Connecting Knurr DCMs is easier if the units have been moved to their final installation position
before beginning to attach them in a cluster.
4.8.1 Connect Two Racks Using the Tool-Less Cluster Kit
1. Remove the adjacent side panels from the cabinets that will be clustered together (see 3.8.1 -
Remove a Panel). The panels on the outside of the cluster can be left on the cabinets to help
manage airflow.
2. Get the needed number of tool-less rack cluster kits.
One kit will cluster two racks together in front and rear. Two cluster kits will cluster three cabi-
nets togethers, three cluster kits will cluster four cabinets together and etc. Each cluster kit con-
tains four interchangeable metal cluster brackets and two plastic filler strips. Pressing the filler
strips into the opening between the cabinets reduces the loss of cold air.
3. Level the cabinets and make sure both frames are the same height off the floor.
4. Remove the racks’ doors (see 3.7.1 - Remove the Door if necessary).
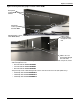
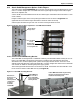
5. Install a cluster bracket as shown in Figure 17 by pressing the integral pins into holes in the
cabinet frame.
The brackets can be installed in any order, starting with either the top of the cabinet or the bot-
tom of the cabinet.
6. Secure the cluster bracket in place with two quarter-turn fasteners as shown in Figure 17.
7. Repeat Steps 5 and 6 for the remaining cluster bracket.
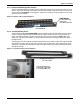
8. Snap the plastic strip in the gap between the cabinets.
4.8.2 Connect Two Racks Using the Factory-Installed Cluster Tab
Cabinets being clustered using the cluster tab can be clustered with or without the side panels. To do
so:
1. Make sure the cabinets are the same height off the floor.
2. Remove the bolt on the top of adjacent corners of the racks, front and rear, as shown in the top left
illustration in Figure 17.
Swing cluster tab over to adjacent cabinet and reinsert and tighten the bolt.
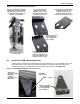
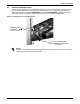
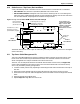
Figure 17 Cluster connections
Remove the bolt shown above
on the left cabinet. Swing the
cluster tab over to the cabinet
on the left and reinsert and
tighten the bolt. Repeat for rear
of cabinet.
Position the cluster bracket against
the front of the cabinets to be
connected. Insert and tighten two
low-profile quarter-turn fasteners.
Snap the dress strip into
place to complete the
cluster connections.