
User Guide


Chapter 1: Installation 3
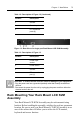
Figure 1.3: Rear View of a single-port Rack Mount LCD KVM Assembly
CAUTION: To reduce the risk of electric shock or damage to your equipment:
- Plug the power cord into a grounded (earthed) outlet that is easily accessible at
all times.
- Disconnect the power from the unit by unplugging the power cord from either the
electrical outlet or the unit.
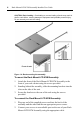
Rack Mounting Your Rack Mount LCD KVM
Assembly
Your Rack Mount LCD KVM Assembly may be rack mounted using
brackets. Before installing the assembly, stabilize the rack in a permanent
location. Be sure to rack your Rack Mount LCD KVM Assembly in an
area of the cabinet that will allow you to utilize the LCD monitor,
keyboard and mouse funtions.
3 Ground
4 Console port
5 PC connection
ports (8)
Table 1.3: Description of Figure 1.3
Number Description
1 Power input
socket
2 Power switch
3 Ground
4 PC connection
port (1)
Table 1.2: Description of Figure 1.2 (Continued)
Number Description