
User Guide


1
CHAPTER
1
Installation
Introduction
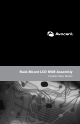
Supporting both USB and PS/2 interfaces, the Rack Mount LCD KVM
Assembly can control up to 16 servers. Built-in keyboard, video and
mouse (KVM) peripherals not only save valuable cabinet space, but also
enable direct channel selection via on-screen display (OSD) or keyboard
hotkeys.
Time-out and password protection offer secure access to the Rack
Mount LCD KVM Assembly, while the hot-plug feature allows for
uninterrupted switching and usage.
NOTE: The Rack Mount LCD KVM Assembly is also referred to as “the assembly”
interchangeably throughout this installer guide.
Getting Started
Before installing your Rack Mount LCD KVM Assembly, refer to the
following list to ensure you have all items that shipped with the
appliance, as well as other items necessary for proper installation.
Supplied with the Rack Mount LCD KVM Assembly
• Rack mount kit
• Power cable
• Ground terminator
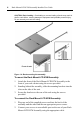
Installation
If you are installing your Rack Mount LCD KVM Assembly to a PS/2
interface, you must turn off all servers before connecting your appliance
to a server for proper installation. USB interfaces do not need to be
turned off before installation.