
User Guide


Accessing the Console Server via the Web Manager.....35
a. Enter the SysContact information (email address of the console server’s administrator,
for example, acs6000_admin@avocent.com).
b. Enter the SysLocation information (physical location of the console server, for example,
Cyclades_ACS6000), then click Save to go back to the SNMP screen.
3. Click Add to add a new community or v3 user.
4. Enter the community name for SNMP v1/v2 or the user name for SNMP v3 in the Name field
and enter the OID.
5. Select the desired permission from the pull-down menu. Choices are Read and Write or Read
Only.
6. If the required SNMP version is v1 or v2, click the Version v1, v2 button, then enter the source
(valid entry is the subnet address).
-or-
If the required SNMP version is v1 or v2 using an IPv6 network, click the Version v1,v2 for
IPv6 network button, then enter the source (valid entry is the subnet address).
-or-
If the required SNMP version is v3, click the Version v3 button, then select the Authentication
Type (MD5 or SHA), enter the authentication passphrase or password, select the Encryption
Method (DES or AES), enter the privacy passphrase and select the Minimum Authentication
Level (NoAuthNoPriv, AuthNoPriv, AuthPriv).
7. Click Save.
NOTE: For SNMP v1/v2c, the console server will allow an administrator to configure the same community
name with different sources (filters) to have access to specific object identifiers (OIDs).
Ports
An administrator can enable and configure serial ports, auxiliary ports, the CAS Profile and the
Dial-in Profile from the Ports tab in the side navigation bar. On the auxiliary ports screen, you can
enable the auxiliary port and configure it based on the type of connected device.
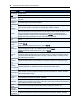
Serial ports
On the Serial Ports table, you can specify the connection profile (CAS, Dial-In, Power, Dial-Out or
Socket Client) based on the type of connected device and you can clone the port, reset to factory
defaults and enable/disable ports.
To enable or disable one or more serial ports: