THANK YOU! Congratulations on your purchase and welcome to the EMERSON, QUIET KOOL® Family. Your new EMERSON QUIET KOOL® Air Conditioner combines high-efficiency operation with portable convenience. By following the operating and care instructions in this manual, your air conditioner will provide you with many years of reliable service.
INTRODUCTION IMPORTANT SAFETY INSTRUCTIONS Basic Safety Precautions— — Electrical Safety.
IMPORTANT SAFETY INSTRUCTIONS READ ALL INSTRUCTIONS BEFORE USE Your safety and the safety of others |s very Important. Wa have provided important safety messages in this manual and on your appliance. Always read and obey all safety messages. This Is the safety alert symbol. This symbol alerts you to potential hazards that can hurt you and others. All safety messages will follow the safety alert symbol and dither the word "WARNING” or “CAUTION".
IMPORTANT SAFETY INSTRUCTIONS READ ALL INSTRUCTIONS BEFORE USE ® Do not start or stop operation by plugging In or unplugging the power cord. It can result n the reek of electric shock. ® If the air conditioner is making unusual sounds or is emitting smokes or an unusual odor, unplug it Immediately. # Do not use If the electrical socket Is close or damaged. It can result In the risk of electric shock or fire. # Do not operate with wet hands or in a damp environment.
IMPORTANT SAFETY INSTRUCTIONS READ ALL INSTRUCTIONS BEFORE USE Do not position the alr conditioner so that pets or house plants are exposed to the direct alr flow. This alr conditioner s designed for normal household use. ® Do not drink the water from the drain pan. Dispose of it properly outdoors or down the drain. @ Do not ops alr conditioner without the filter accurately In place. Operation without the filter could damage the unit. ® Clean the fleeter every two weeks, or more often If needed.
IMPORTANT SAFETY INSTRUCTIONS READ ALL INSTRUCTIONS BEFORE USE ELECTRICAL SAFETY INTEGRATED CIRCUIT BREAKER safety, the power cord features an Integrated RESETTING i Test and reset buttons ara provided on the TEST plug sacs. The cultural breaker should be tested periodically by pressing tha TEST button. Fit doss not cause the circuit breaker to trip, or If the RESET button well not stay engaged, unplug the air conditioner immediately and contact your EMERSON QUIET LOOK service technician.
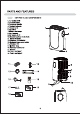
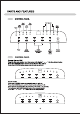
PARTS AND FEATURES KEY PARTS AND COMPONENTS 1. Air Quiet Grill 2.Control Pans! 3.Carrying Hands §.Power chord S. Alr Liter 7.Middle drainage Blair Exhaust 8.Air Intake Grill 10. Condsnsation Drain hols 11.Exhaust Hose 12.Window Kit Adapter 13.Exhaust hose connector 14, Window Kit 15 Rubber plug 16.
PARTS AND FEATURES Dry Mode Press the "mode” button until the Dry mods indicator lit The screen will display the ram's current temperature and the fan will automatically tum on Low speed. Note: In this made, fan sped cannot be adjusted Fan Mode Press the “mode” button until the Fan mode Indicator it The screen will display the room’s current temperature and you can choose your fan speed: Hi, Med, Low, or Auto. Note: In this mode, the air exhaust hose doss not need to be connected.
PARTS AND FEATURES Timer Mode The timer function allows the user to delay the unit startup or shutdown. How to delay startup Plug I the unit, &0 the unit tums to standby. Cross the “met” button, the Timer Indicator and number of hours on the screen wil lash. Tap or hold the UP arrow (a) or DOWN arrow (v) to change delay start timer at 0.5 hour Increments up to 10 hours, then at 1 hour Increments up to 24 hours. After 5 Seconds, the Timer Indicator and the display will stop flashing.
HOW TO USE REMOTE CONTROL LCD Display Increasing POWER Temperature ONION = T Dacron Temperature Fan speed Stacie cre Mods Sanction INSERTING OR REPLACING THE BATTERIES Removal the cover on the back of tha ram ate control; Instar two new “AAA” 1.5V batteries {ses Instructions Inside the remote section and add battery compartment). Replace the cover. Point the remits control at the control panel on the unit.
HOW TO USE USING THE REMOTE CONTROL TURNING THE UNIT ON Plug into the outlet. Press the POWER button(when muted on, the unit starts operating in the same mads as when It was muted off). To switch the unit off, press POWER button ag: Do NOT switch the urinal off by removing the plug. Always switch it off by pushing on the POWER button and waiting few minutes before removing the plug. Only In this way the unit will perform the standard checking. then remove the plug.
HOW TO USE Eco Mode Press the MODE button * % "until the arrow* « " light up next In this mods, you can suspected fan sped “H", “Med", “Low" or "Alta” by press the Fan speed button. Prostheses” ¥ "and " a * bunion to chooses the temperature you want. Mote: The uni twill run in synergy saver(ECO) mode when wad for the first time. In this mods, the fan will continue to run for 3 minus after the compresses shuts off.
HOW TO USE *CI°F function Cross the * button to switch between Fahrenheit Celsius. Timer Mode How to program the delayed start up Lug the ult Into the outlet and tum the unit to standby. Press the Timer button* & ~, the arrow* v " will fish above " wo = Choose ths Mads, Fan Snead, and Temperature. Confirm the settings by pressing the timer button * = * The time Is displayed and the *h" symbol will flashes. Set the time you want the unit to switch off using the buttons “a*tor*v” (rom 30 minutes to 24 hours).
INSTALLATION INSTRUCTIONS Installation In a double-hung sash window 1.Cut the foam seals A (adhesive type) fo the proper lengths and attach them to the window and stool. {Fig.8) 2.0pen the window sash and place the window slider kit on the window stool (Fig.8). Attach the window slider kit to the window stool and adjust the length of the window snider kit to the width of the window. ‘Screw down tha two crews on the window slider kit. Sae Fig 9.
INSTALLATION INSTRUCTIONS Continuous Drainage During the DRY Mods, you will dean a garden hose (sold separately) to drain the condensate from the unit. Fallow the spats blow: » Unscrew the drain cap of continuous drain outset (Fig.20). Connection end of the garden hose (sold separately) to the drain outing then lead the thee end into adrenal that Is lower than the unit (Fig.21). Figure 20 Figure 21 ® Condensate may flow out after removing the drain cap, If the ult Is running In Cool or ECO Mode.
CARE AND CLEANING Clan your sir conditions occasionally to keep it looking like naw. Bo sure to unplug the wilt before cleaning to prevent shock or fire hazards. CLEANING THE UNIT The cabinet and front may be dusted with an ill-es cloth or washed with a cloth dampened in a solution of wan water and mild Quid dish washing detergent. Severus harsh cleaners, wax or polish on the cabinet front. Ba sure to wring excess water from the cloth before wiping around the controls.
TROUBLESHOOTING BEFORE CALLING FOR SERVICE Ba fore you call for service, review this list. It may save you teems and money. the electrical outlet. * The fuse Is blown or the sir cult breaker ha stripped. * Power failure. « =Py " appearance the display. + Room temperature Is less than the set temperature. Problem Possible Causes Solutions [Alr conditioner will | + Tha alr conditioner plug Is o electrical plug Is plugged not start not completely instar into ly into a live, properly grounded outlet.