
Install Instructions

www.emersonclimate.com/owcontrols
Cores & Filters with STAS & ADKS Shells
Cores & Filters with STAS & ADKS Shells
Instruction Sheet
PA-00240H
October 2011
11911 Adie Road P.O. Box 411400 St. Louis MO 63141 USA CUSTOMER SERVICE (314) 569-4666
INSTALLATION & REPLACEMENT INSTRUCTIONS
To prevent contamination, do not open the package until
ready to install (until step 8).
For a better comprehension, please refer to the diagrams of
the last page.
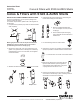
1. Pump down the system & pump down the STAS or ADKS
shell completely.
Warning: System lines must be de-pressurized before
attempting to service. Failure to do so can result in
system damage and serious bodily injury.
2. Remove the cover bolts, cover, and examine the cover
gasket. If the gasket surface is damaged as indicated by
material adhering to the end of the shell, the old gasket
must be discarded.
3. Withdraw the internal assembly by pulling on the handle.
1 Core
Multiple Cores
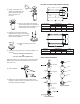
4. Disassemble the internal assembly by unscrewing the
handle while holding the inlet retainer.
ADKS
STAS
5. Removecontaminatedlter-drier
core. For multiple core units, remove
coupling(s).
6. Clean all internal parts thoroughly,
giving particular care and attention to
outlet screen.
7. Put the Seal Ring inside the outlet retainer.
8. Remove the core from can package and reassemble as
rapidly as possible to minimize moisture contamination.
9. Installthenewcoreorlterintheoutletretainer.
10. Make certain that the end of the block with the
tapered inside diameter is placed against the
outlet retainer. With multiple block units, place
coupling between each block or core.
11.Positiontheinletretaineroverthenalcoreorlter,
andscrewthehandlermlyinplace.Carefullyinsertthe
assembled unit into the shell assembly.
or