
Full Product Manual


Installation and Instructions
11
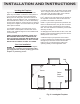
Installing the Firebox
This list of specific instructions will help you make
certain that every installation operation is done correctly.
Complete the installation steps in the sequence
shown.
LOCAL BUILDING CODES SHOULD BE CONSULTED
IN ALL CASES AS TO THE PARTICULAR REQUIR-
MENTS
CONCERNING THE INSTALLATION OF
FACTORY BUILT FIREPLACES.
Select the location for the fireplace by taking into
consideration the factors previously outlined in the
Locating the Fireplace section of this manual.
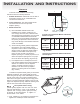
Step 1: Framing the Firebox
The width of the framed openings must be 37"
for 32" models, 41" for 36" models or 47" for 42"
models. (Fig. 2, page 7)
The entire fireplace can be elevated above the
floor to achieve a raised hearth effect. This can be
done by adding a small platform to achieve the
desired height.
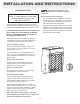
Step 2: Install the Firebox
Install the firebox into the framed opening by
setting it directly in front of the opening and
sliding it into the proper position.
Step 3: Level the Firebox
Check the level of the firebox on the top edge of
the fireplace face. Shim if necessary.
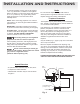
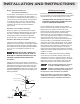
Step 4: Secure the Firebox
Four (4) nailing flanges are supplied with the
fireplace to level the box and secure firmly in
place; Bend the nailing flanges from
the sides of
the fireplace as shown in Figure 9.
Note: The nailing flanges have two (2) sets of
holes to allow for adjustment for 1/2" or 5/8" offset
of the face of the unit. When installing the nailing
flanges, choose the set of holes on the nailing
flange that fit with your application.
Note: This firebox employs spacers, stand offs
and nailing flanges to inhibit contact of parts of the
firebox with combustible construction .
do not alter the spacers or divert
from their intended use or notch the framing in
any manner.
Step 5: Gas Piping and Connection
The gas piping must be installed in accordance
with local codes or, in the absence of local codes,
in accordance with the National Fuel Gas Code,
ANS Z223.1/NFPA 54, latest edition.
Piping should be tested for leaks prior to final wall
installation. Test for leaks, using a soap and water
solution or any acceptable solution or mechanical
gas leak detector, after completing the connection.
DO NOT USE OPEN FLAME.
Installation must conform with local
codes, or in the absence of local codes,
with the National Fuel Gas Code,
ANS Z223.1/NFPA 54.
E
DETAIL E
Fig. 9